… but I was always wondering if I could somehow increase laziness time by automating the process. Frances d’Ath
While this wasn’t quite my thought as I started working on some git hooks, I realized that so much of what we developers take for granted was built for exactly this reason. I started my git hook journey because I didn’t feel like clicking through WordPress plugin UI when I changed branches and needed a plugin under development activated.
I was looking to ‘increase laziness time by automating the process’ of plugin activation while at the same time trying to eliminate those times I had done work and was wondering why it wasn’t showing up, only to find that I forgot to activate the plugin. Let’s see how git hooks can increase your laziness time.
What Do Git Hooks Do and How Do They Work?
First, git hooks are programs that can be used to trigger actions at specific points in the execution of git. There are a bunch of hooks available, and every time you get a git repository ready you have sample hooks installed for you to play with. You can find these sample hooks in .git/hooks. The names of each file correspond to the hook that will run them. To use any of them you’ll need to remove the .sample file extension and make them executable, but we’ll get to that.
Some of the more popular ones will be:
- pre-commit: runs just before you commit code to your repository
- pre-push: runs before you push your repository to any other location
- commit-msg: runs when a user tries to save a commit message
- pre-receive: runs before code has been received
- post-commit: runs after a commit has been made
- post-receive: runs after the remote location has received the pushed code
Hooks can do anything you can write a script for, and you can use any language you’re comfortable with to write your scripts. The most common languages are Shell, Ruby, Perl, and Python, but if you’re comfortable with PHP there is no reason you can’t write a script in PHP.
Git hook script files are interpreted according to the shebang notation you use at the top of your file, so you don’t need to have a .php extension on your file to write a script in PHP. You’d mark the top of the file with the location of PHP on your machine, like below.
#!/usr/bin/env php
With that preamble, let’s dig into writing our script so that when you change branches git will automatically toggle a plugin on or off depending on which branch you have checked out. To follow along, the other thing you need on your server, is a copy of WP-CLI. Make sure that whatever user you’re logged in as can run WP-CLI commands. (If you want to learn more about WP-CLI we reviewed a bunch of packages for it already in this post).
Getting Your First Git Hook Set Up
To start, we’re going to use the post-checkout hook which means our file will be named the same. Open up your terminal editor and create a file called post-checkout in your .git/hooks directory.
touch .git/hooks/post-checkout
Next we need to make that file executable so that git can run it. We’ll do this from terminal as well with the following command and then open it in your editor of choice.
chmod +x .git/hooks/post-checkout
vim .git/hooks/post-checkout
Next copy the code below into your file so that we can test to make sure it works properly.
#!/bin/bash
echo “changed branch”
We can test this now by changing the branch we’re using in git. So that we’re all on the same page, let’s start by checking out a new branch in terminal to work with.
git checkout -b hook-test
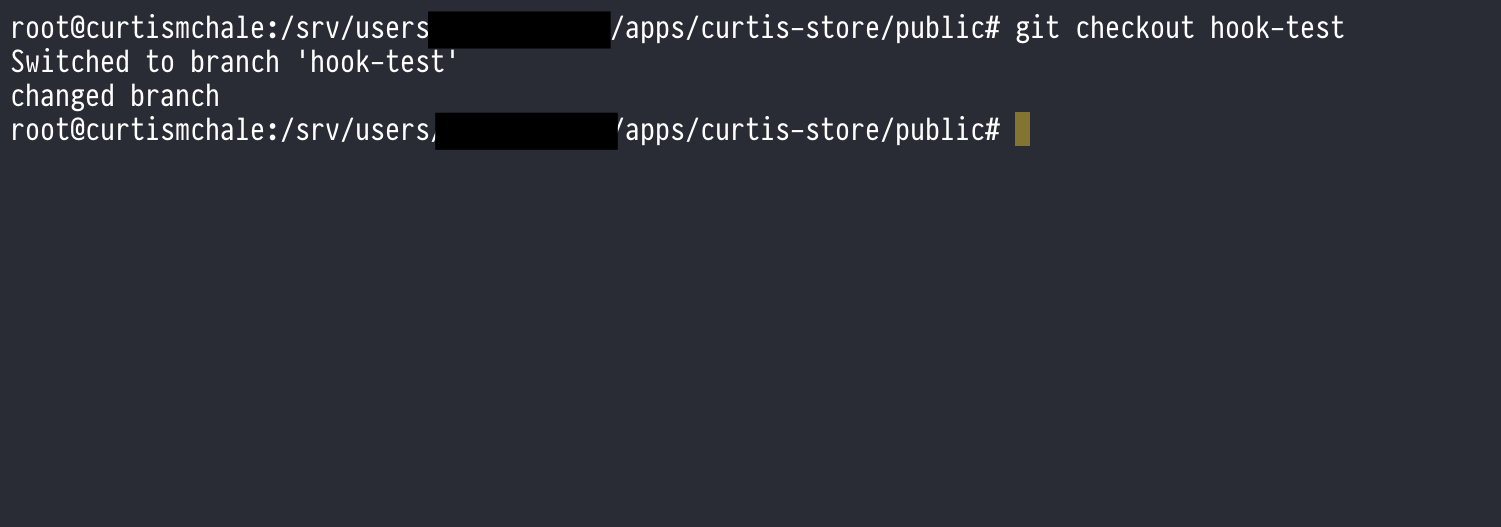
When that command finished, you should have seen changed branch echoed into your terminal like I have in the screenshot below.

Now that we know our script is getting run, let’s take it a step further and use WP-CLI to activate a plugin. For testing we‘ll use WooCommerce assuming we need to activate it for the feature we’re building. Inside our program, we can use the exact WP-CLI command we’d use to activate a plugin from the terminal. Let’s also change the output from our script to tell us that the plugin was activated.
#!/bin/bash

wp plugin activate woocommerce
echo “activated WooCommerce”
You can check that the above works by deactivating the plugin from the WordPress UI and then changing branches from our hook-test branch to the standard master branch. When you do this you should see that WooCommerce is activated.

Conditional Branch Detection With Git Hooks
The script above validates the functionality we want, but currently we’re going to activate WooCommerce every single time we switch branches. We wanted our plugin activated every time we change to the branch that it appears in. In the case of my project, the plugin only currently exists on a single branch so it will get deactivated automatically once the file isn’t where WordPress expects it. Lucky for us, git hooks do have other information available while they’re running.
Let’s take the file post-checkout file we’re working with and replace it with the one below then change branches again to see the output in your terminal.
#!/bin/bash

oldrev=$1
newrev=$2
branch_name="$(git symbolic-ref HEAD 2>/dev/null)"
echo "branch is $branch_name"
echo "oldrev is $oldrev and newrev is $newrev"
This is going to give us a bunch of information about the repository we’re working in as we change branches. When you change from our hook-test branch to master you should see the information below.

We can use this information now to see exactly what our branch is called so that we can build a conditional around turning WooCommerce off or on depending on which branch we’re currently using. Note in the code below I’ve commented out the two echo statements you can use for testing. I usually leave them in my scripts so that I can use them when I’m developing a new script but don’t want to see the output every time I interact with git.
#! /bin/bash

oldrev=$1
newrev=$2
branch_name="(git symbolic-ref HEAD 2>/dev/null)"
#echo "branch is $branch_name"
#echo "oldrev is $oldrev and newrev is $newrev"

if [ "refs/heads/hook-test" == "$branch_name"];then
    wp plugin activate woocommerce
    echo "WooCommerce activated"
fi

if ["refs/heads/master" == "$branch_name"];then
    wp plugin deactivate woocommerce
    echo "WooCommerce deactivated"
fi
Now, our script above does what we want. When we change to our hook-test branch, our script will activate WooCommerce. When we change back to our master branch, our script will deactivate the plugin.
But that’s not all we can do with git hooks.
Spiffy Stuff to Do With Git Hooks
Let’s start by looking at my favorite script, because it provides the option for animated gifs and telling on someone for attempting to commit code directly to the master branch and of course we love our Slack apps. For this example we’ll use the pre-commit hook. Start by renaming pre-commit.sample to pre-commit and then making it executable as we did above. You’ll also need to configure a Slack app for Incoming Webhooks so our script can use it.
#! /bin/bash

username=$GIT_AUTHOR_NAME
branch="$(git symbolic-ref HEAD 2>/dev/null)"


if [ "$branch" = "refs/heads/master" ]; then
echo "WHOA that was '"${branch}"' you should not do that. Time to sound the alarm"
    curl -X POST -H 'Content-type: application/json' /
    --data '{"text":"Hey!! '"$username"' tried to push code directly to '"$branch"' and that is a big no-no.", "attachments": [{ "fallback": "dumpster fire", "color":"warning", "image_url":"https://media.giphy.com/media/FqtWrearu5vb2/giphy.gif"}] }' /
    http://your_slack_web_api_url
    exit 1 # if you remove this it won't block the commit but it will send the message to slack
fi
The hook above starts by getting the name of the current git user and then the branch name. From there we check to see if we are trying to commit to the master branch and if so, attach a dumpster fire gif along with our message to the channel. You can see below what it would look like to the user trying to commit to the branch and then what it looks like in Slack. The user will still be able to commit to another branch and then merge into master without any warnings.


Let’s do one more example with the ‘commit-msg’ hook to make sure that we get a commit message of at least 10 characters, because it’s unlikely anything less than that will be useful. To start, find or create the commit-msg hook file and make it executable as we’ve done previously. Then, paste the code below into the file.
#!/bin/bash

# Hook to make sure that no commit message line is lower than 10 characters

while read line; do
    # Skip comments
    if [ "${line:0:1}" == "#" ]; then
        continue
    fi
    if [ ${#line} -le 10 ]; then
        echo "Please enter a message with at least 10 characters."
        echo "The following commit message has only ${#line} characters."
        echo "Message: ${line}"
        exit 1
    fi
done < "${1}"

exit 0
To avoid counting commented-out lines against our 10 character limit we start by reading each line, skipping any comments. If we’re not on a comment, then it checks for a line with 10 characters. If it doesn’t find a line with at least 10 characters, it will echo a message to the user and exit the commit without saving it so that the user must commit again with a more descriptive message.
On the surface the two git hooks we’ve used so far seem very similar in execution. They both are stopping the user at the commit stage, but commit-msg lets you adjust the message the user is trying to add, pre-commit doesn’t allow for this. If you want to work with the messages being committed, use the most directly applicable hook, commit-msg.
More Ways to Increase Laziness Time
We’ve only scratched the surface of what you can do with git hooks. You could use WP Enforcer to enforce WordPress coding standards on commit or allow tests to be skipped based on some text in the commit message. You can even use server-side hooks on a remote repository to handle site deployment. You could even have WP Migrate DB Pro WP-CLI pull the latest copy of the live database when you pull the latest version of your code.
So, what are you going to do to increase your laziness time? Let us know in the comments.


