Laravel Valet’s minimalist approach makes it a great choice for local WordPress development. In this tutorial, I’ll cover what Valet does (and what it doesn’t), then I’ll show you how to install Valet and use it to serve up a local WordPress site.
Setting up a local development environment used to be a major hurdle. There were so many options and always a million ways to mess up the installation. It was easy to get overwhelmed before you even saw any code. Thankfully, over the years, new technologies have come around to make this process easier and faster. These days my development environment of choice is Laravel Valet because it is lightweight, quick to set up, and runs effortlessly in the background. It’s a set-it-and-forget-it solution for those looking to develop with PHP on macOS while using minimal resources.
- Pros
- Cons
- How to Get It
- How to Use Valet
- Using Valet With Other Versions of PHP
- Using Valet With WordPress Multisite
- Debugging
- On to You
Pros
- Running a virtual machine isn’t required, giving you one less thing to worry about.
- There’s no need to create a fresh configuration for each new site.
- Valet runs Nginx behind the scenes, starting when your machine starts.
- All
*.testdomains will be proxied automatically to sites on your local machine using Dnsmasq. You don’t need to edit/etc/hosts! - Valet allows you to share your local sites publicly using tunnels through Ngrok or Expose. This is incredibly helpful when testing on different devices or demoing for clients.
- It offers native support for 21 different frameworks and content management systems, including WordPress.
- It allows you to create custom drivers to extend Valet’s support to other types of PHP applications.
Cons
- There’s no official support for other operating systems besides macOS, although there is a thriving Linux fork as well.
- Unlike Homestead, which is an official prepackaged Laravel Vagrant box with everything included, you’ll need to install PHP and a database.
- Valet doesn’t support development in languages other than PHP.
- You’ll need to install Nginx, PHP, MySQL, and all their dependencies in macOS via Homebrew
How to Get It
Let’s get Valet up and running! Before we install Valet and use it, we need to make sure the port is available, install or update Homebrew, and install Composer and PHP. You might also want to set up your database at this point. If you already have those and you’re confident your port 80 is clear, you can go ahead and skip to installing Valet.
Check Port 80
We need to ensure that no other programs, such as Nginx or Apache, are using port 80. To do that, open Terminal app and run the following command:
lsof -i :80
This will show which applications, if any, are currently using that port. If you don’t get an empty output for that command, you may need to stop or uninstall some applications.
Install Homebrew
If you already have the Homebrew package manager installed, run an update to be sure you have the latest version:
brew update
If you need to install it fresh, run this instead:
/bin/bash -c "$(curl -fsSL https://raw.githubusercontent.com/Homebrew/install/HEAD/install.sh)"
Initialize Homebrew with an update once it’s installed using the brew update command from above.
Install PHP
Now that you have Homebrew, installing PHP takes only one command:
brew install php@8.1
This installs a specific version of PHP, which we need for our WordPress installation. You can install additional versions, such as PHP 8.0, by changing the numbers after the @ symbol. If instead you’d like the latest stable version of PHP, it would look like this:
brew install php
Install Composer
Next we need to install the Composer dependency manager.
brew install composer
Now we can add the Composer bin directory to our system’s PATH:
export PATH=$PATH:~/.composer/vendor/bin
You can run that command, but it won’t persist across terminal sessions. You’ll need to update your PATH by editing a file, typically ~/.bash_profile.
Set Up a Database
Since we’ll be serving up a WordPress site, we’ll go ahead and set up MySQL here. Again, Homebrew makes this a one-command process:
brew install mysql
You will also want to start MySQL, and to set it to start on future bootups.
brew services start mysql
Installing Valet
On to the main event! We will now use Composer to require Laravel Valet as a global package, then run the Valet installation.
composer global require laravel/valet
valet install
This will install Nginx, configure PHP, and install and configure Dnsmasq. Once installation is complete, Valet automatically starts its daemon processes when your machine boots up.
To test that everything is running as it should, do a ping to see if a *.test domain responds on 127.0.0.1.
$ ping valet.test
PING valet.test (127.0.0.1): 56 data bytes
64 bytes from 127.0.0.1: icmp_seq=0 ttl=64 time=0.028 ms
It’s working! 🎉
How to Use Valet
The first step in using Valet for local WordPress development is to set up and register your project directory. This directory will hold your PHP applications and websites.
mkdir -p ~/Sites/valet
The Park Command
Now, we will register this directory with Valet using the park command to add it to Valet’s path. Once you do this, any subdirectory will be accessible in the browser automatically at http://{directory-name}.test.
cd ~/Sites/valet
valet park
There may be situations where you want to have a directory serve an application on Valet outside of a parked directory. If that’s the case, you can use the link command to connect specific, individual directories to Valet.
cd ~/myapp
valet link
You can now access this at myapp.test.
Install WordPress
There are a lot of ways to install WordPress, but the command line is usually the fastest. Let’s use WP-CLI and a handy package from Evan Mattson to set up our WordPress site.
If you don’t already have WP-CLI installed, you can install it with Homebrew.
$ brew install wp-cli
$ wp package install aaemnnosttv/wp-cli-valet-command:@stable
$ wp valet new wordpressonvalet
Don't go anywhere, this should only take a second...
Success: wordpressonvalet ready! [https://wordpressonvalet.test](https://wordpressonvalet.test/)
With wp valet new wordpressonvalet, you get a new directory, new database (wp_wordpressonvalet), and WordPress downloaded and installed. It also secures the site, serving it over encrypted TLS using HTTP/2, instead of the default HTTP. If you want something other than defaults for configuration settings, you can pass in parameters as described here.
Note: if you need to secure a site manually (maybe for a non-WordPress app), run valet secure <directory-name>.
$ valet secure wordpressonvalet
Restarting nginx...
The [wordpressonvalet.test] site has been secured with a fresh TLS certificate.
Now you can visit your URL (https://wordpressonvalet.test) in the browser and see Valet in action! And just like that, we’ve gone from no local environment at all to serving a local WordPress site. According to my watch, it took about 20 minutes from start to finish.
Using Valet With Other Versions of PHP
Valet makes using another version of PHP incredibly straightforward whether you want to do it globally or at the per-site level. If you choose a PHP version that you don’t have installed, Valet will install it for you automatically via Homebrew (thanks, Valet!). For a global change in PHP version:
valet use php@8.2
This will change all sites in parked or linked directories to use PHP 8.2. However, if you’d like to change PHP version per site, you can use the isolate command:
cd ~/Sites/valet/oldersite
valet isolate php@8.1
Note: the isolate command only changes the PHP version used by Nginx to serve sites. It does not change the version used by CLIs (PHP, Composer). To use the isolated PHP version for the CLI, use valet php or valet composer.
PHP Monitor
PHP Monitor (phpmon) is a useful tool if you plan to work with multiple PHP versions. It’s a lightweight app tightly integrated with Laravel Valet. Amongst its many features is showing the active PHP version in your status bar. To install it:
brew tap nicoverbruggen/homebrew-cask
brew install --cask phpmon
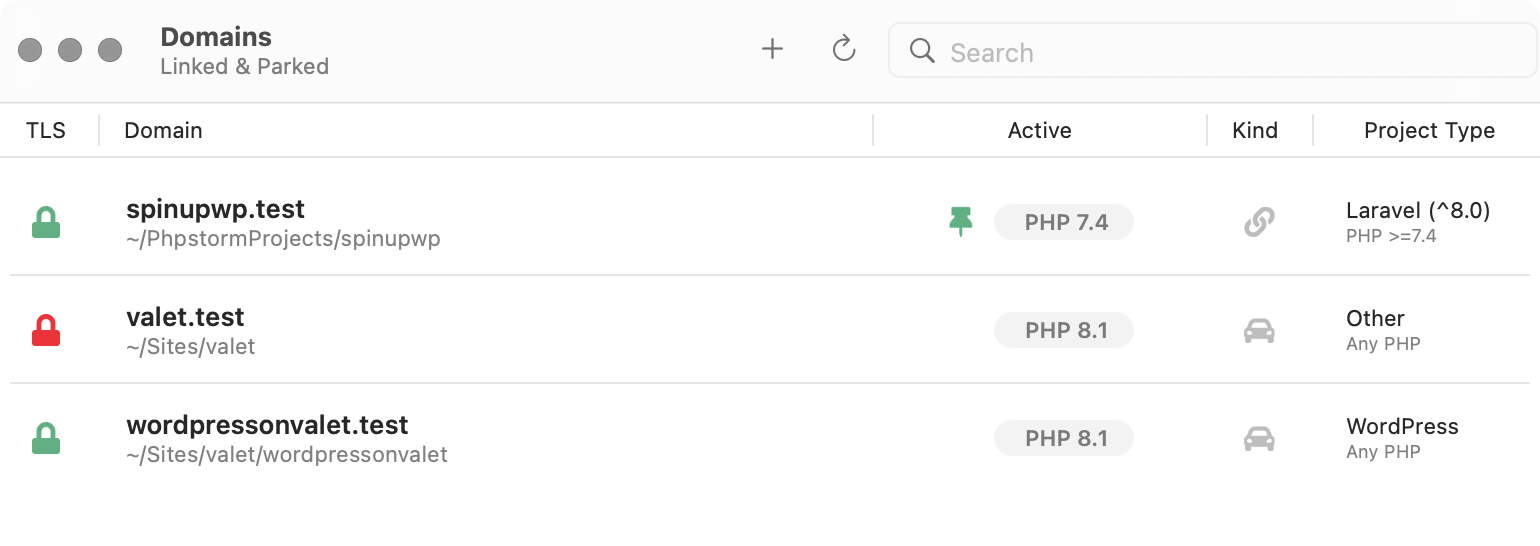
When you start up the app, you’ll see your current global PHP version in the status bar. Clicking on it will open a dropdown with some useful links for Valet, PHP, and Composer configuration. Click View Linked and Parked Domains… in the dropdown and you’ll get a helpful list of domains with the PHP version they’re using. You can also view and control isolation here.

Using Valet With WordPress Multisite
This process is all well and good for a single site, but let’s say we’ve set up our wordpressonvalet.test site as a WordPress multisite with sub-domains. We now need to add a new domain name that will resolve to the same folder. To do this, we’ll use the link command:
cd ~/Sites/valet/wordpressonvalet
valet link subsite.wordpressonvalet.test
Now both domains, wordpressonvalet.test and subsite.wordpressonvalet.test, will be served through Valet, sourced from the wordpressonvalet.test directory.
If you’re using a multisite setup with the subdirectory configuration, you will need to use a custom driver since Valet does not support this by default. You can follow this guide to write your own custom driver or use an existing one, like this one from Objectiv.
Any such custom driver files for Valet go in ~/.config/valet/Drivers/.
Debugging
Laravel Valet typically works out of the box, but some users may run into issues with disk access, PHP versions, or a missing environment variable.
PHP Version Issues
Deprecated: rtrim(): Passing null to parameter #1 ($string) of type string is deprecated in phar:///usr/local/bin/wp/vendor/wp-cli/wp-cli/php/utils.php on line 981
If you’re running into bugs in your application pointed at deprecated functions, most likely you need to be running an older version of PHP with that site. You can use phpmon to check what version you have running for that directory and isolate a different version if needed. You can also check valet php --version from inside the site directory.
Valet Not Recognized as a Command
You may be missing the Composer environment variable from your path. Run echo $PATH and if you don’t see a reference to ~/.composer/vendor/bin, go back and follow the instructions for adding it in the right place. You may also need to restart your terminal.
Resetting Your Installation
Sometimes starting over is the best plan if you continue to have trouble. To reset your installation, run:
composer global update
valet install
If that doesn’t help, you can perform a hard reset of Valet by running the following:
valet uninstall --force
valet install
Further Troubleshooting
Whenever you’re having issues, a good first place to look is the log file, located at ~/.config/valet/Log. You’ll find logs for any PHP errors and Nginx issues. Also, Valet’s master configuration file is ~/.config/valet/config.json. In the config, you can change things like the “default” site (served instead of a 404 when visiting an unknown test domain) or the TLD (.test by default).
On to You
Valet is a great option for Mac minimalists who don’t mind installing lots of software on their machine and don’t like messing around with containers and VMs. Valet lets you get to your WordPress development quickly!
Do you use Laravel Valet? Why did you choose it over the many other options? Let us know in the comments.


