

In the first post of this series, we started scaling our WordPress app to handle more traffic by extracting the database to a separate server so that we can eventually add multiple app servers to our infrastructure. In this post we’re going to do the same for the filesystem and also introduce a level of high-availability and high-reliability by building a replicated network filesystem using Gluster. But, before we start building a network filesystem it’s important to know why we need to do so in the first place.
Reminder that in this series, we’re building upon what we learned in our original Install WordPress on Ubuntu 22.04 series. So if you haven’t yet gone through the original, you should start there.
Why a Network Filesystem?
Let’s say a user uploads an image to the WordPress Media Library and embeds it into a blog post. Once published, traffic to the post will be distributed to the app servers via our load balancer (which we’ll be adding in the next post in this series – subscribe at the end of this post if you don’t want to miss it). The problem is that the image only exists on the server where it was originally uploaded, which will result in 404 responses when the load balancer attempts to pull the image from one of the other app servers. A network filesystem ensures that all app servers share a single location to read and write data, therefore when a file is uploaded to the Media Library it will automatically be available to all app servers.
A network filesystem isn’t the only approach when horizontally scaling your apps. You could opt to use object storage, such as Amazon S3 or Spaces. WordPress core, plugin and theme files would remain on each app server’s local filesystem, but Media Library items would be pushed to object storage. There are however two caveats when using object storage:
- App server files can become out-of-sync. For example, updating WordPress via the dashboard would only update the app server which triggered the update. All other app servers would continue to run an outdated version of WordPress. The same goes for plugin and theme updates. To overcome this you would need to either introduce some form of deployment strategy or manage your site using Git.
- WordPress doesn’t support object storage for your Media Library items out-of-the-box. Luckily, we created WP Offload S3 so that you can store your Media Library on Amazon S3.
If you plan on managing your site via Git or using a deployment strategy, then object storage is a cost effective solution (because you don’t require additional servers) and often simpler to implement thanks to plugins such as WP Offload S3. However, in this series we’re not going to use a deployment strategy or Git so in this post I’m going to demonstrate how to configure a network filesystem. Let’s begin!
Gluster Server Configuration
Start by creating 2 new droplets which will form your Gluster cluster 😂. They should reside in the same region as your existing servers and have ‘Private networking’ enabled so that they can communicate with each other. You can create the 2 droplets simultaneously via the Digital Ocean dashboard.

As we did in part 1 you will need to secure both servers using the steps outlined in WordPress Yourself Part 1 – Setting Up a Secure Virtual Server. However, the firewall rules should be tweaked to only allow inbound traffic for SSH.
sudo ufw allow ssh
sudo ufw enable
Next, you need to add the Gluster PPA and install the Gluster server package. This should be carried out on both servers.
sudo add-apt-repository ppa:gluster/glusterfs-3.12
sudo apt-get update
sudo apt-get install glusterfs-server
Once installed you can test that the servers are able to communicate using the following command (remember to substitute your server’s private IP addresses):
gluster peer probe private_ip_address_1
gluster peer probe private_ip_address_2
If both servers can probe each other, create and start a new volume. This only needs to be performed on one of your Gluster servers:
gluster volume create ashleyrich_com replica 2 transport tcp private_ip_address_1:/ashleyrich_com private_ip_address_2:/ashleyrich_com force
gluster volume start ashleyrich_com
This will create a replicated volume where both servers contain a copy of every file.
Client Configuration
It’s time to configure the existing app server to use the newly created Gluster volume. SSH into your server and add the required PPA and install the Gluster client:
sudo add-apt-repository ppa:gluster/glusterfs-3.12
sudo apt-get update
sudo apt-get install glusterfs-client
Next, create a new directory where we can mount the Gluster volume. I created it under my home directory next to the existing ashleyrich.com directory.
mkdir ~/ashleyrich_com
You can now mount the volume using the private IP address of fs1.ashleyrich.com:
sudo mount -t glusterfs private_ip_address_1:/ashleyrich_com ashleyrich_com
Copy the local files to the new Gluster volume. The -a flag will recursively copy and preserve file permissions and ownership.
cp -a ashleyrich.com/* ashleyrich_com
You now need to tell Nginx to use the new root directory for the ashleyrich.com domain. Edit the site’s virtual host file, ensuring the access_log, error_log and root directives all to point to the new volume.
The final step is to ensure that the volume is mounted on system boot. To do that we’ll use fstab.
sudo nano /etc/fstab
Add a new line to the end of the file which follows the [HOST]:/[VOLUME] /[MOUNT] glusterfs defaults,_netdev 0 0 format.
private_ip_address_1:/ashleyrich_com /home/ashley/ashleyrich_com glusterfs defaults,_netdev 0 0
Now if you reboot the app server the volume will automatically re-mount. To test that everything is working correctly restart Nginx and reload the site. If the site doesn’t load, double-check the previous steps.
Test Replication
Let’s ensure that the replication features of Gluster are working correctly. Turn off fs1.ashleyrich.com and reload the site. It should continue to work as expected, because the files are still available on fs2.ashleyrich.com. But what happens when a file is created or modified? Let’s test that by creating a new temporary file in the root of the volume. This should be done from the app server (Gluster client).
touch test.txt
Turn on fs1.ashleyrich.com and navigate to the volume root. You’ll see that the test.txt file has been created even though the server was offline during its creation. Awesome!
Wrapping Up
Now that we have a network filesystem configured here’s what our current architecture looks like:

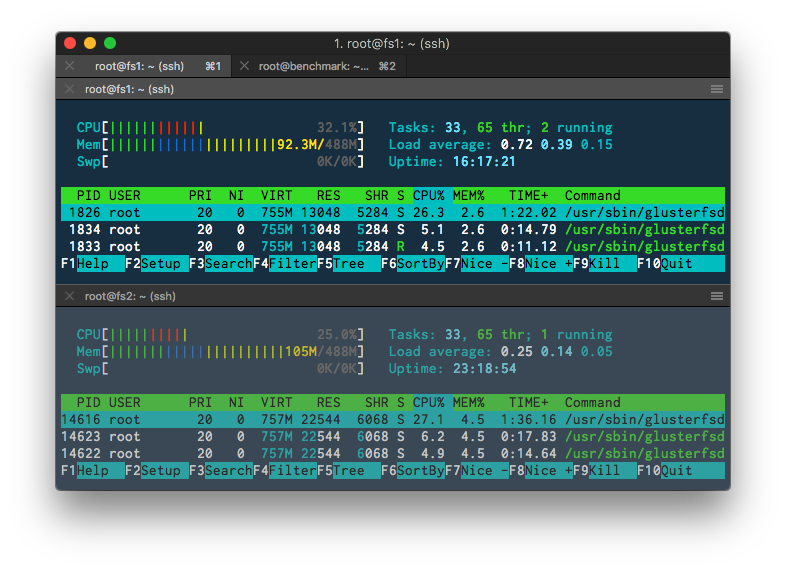
If you run htop on your Gluster servers you’ll see that they roughly utilize the same amount of system resources even under load. This is because requests are automatically distributed between your Gluster servers. Think of it as a load balancer for your filesystem.
That wraps up part 2. In the next article we’ll add a load balancer and an additional app server to our infrastructure. This will reduce the CPU usage on the current single app server and allow us to handle more traffic.
Have you used a network filesystem such as Gluster before? Let us know in the comments below.
Don’t want to miss the next post in this series? Be sure to subscribe below.


