Over the last few years of supporting our former products as Delicious Brains (notably WP Offload Media and most recently, SpinupWP), one thing has become clear:
Caching in WordPress is often misunderstood (and sites run slower than they should as a result).
In this post, I hope to demystify some of those misconceptions and provide a little clarity on the minefield that is WordPress caching. Hopefully, by the end of this post, you’ll have a better understanding of how the various layers of caching play a role in WordPress optimization.
What is Caching and Why is it Important?
A cache is a storage layer that stores temporary copies of data or files from one request, so that future requests can access that content faster. In WordPress, this can mean anything from caching an entire page, to caching the results of a database query.
Before we dive into the various caching mechanisms, it’s essential to understand the benefits of caching. Caching plays two major roles:
- It improves application performance. For WordPress sites, this means that your site loads faster and provides a better user experience.
- It increases application throughput. Meaning, your site can handle more traffic.
What’s more, caching can increase both application performance and throughput without increasing hosting costs. This is because you need far less system resources (CPU & memory) to host a site that has been correctly cached. Also, better performance can be beneficial for SEO, as page speed is one of the ranking factors that search engines will use. It really is a win-win strategy (when done correctly).
Caching Layers
WordPress is a database-driven CMS, meaning there are many moving parts when handling an incoming request. Out-of-the-box WordPress has to query the database and render the page before it can be sent to a user. This happens on every single incoming request, which is hugely inefficient if the page content hasn’t changed. A typical request will look something like this:
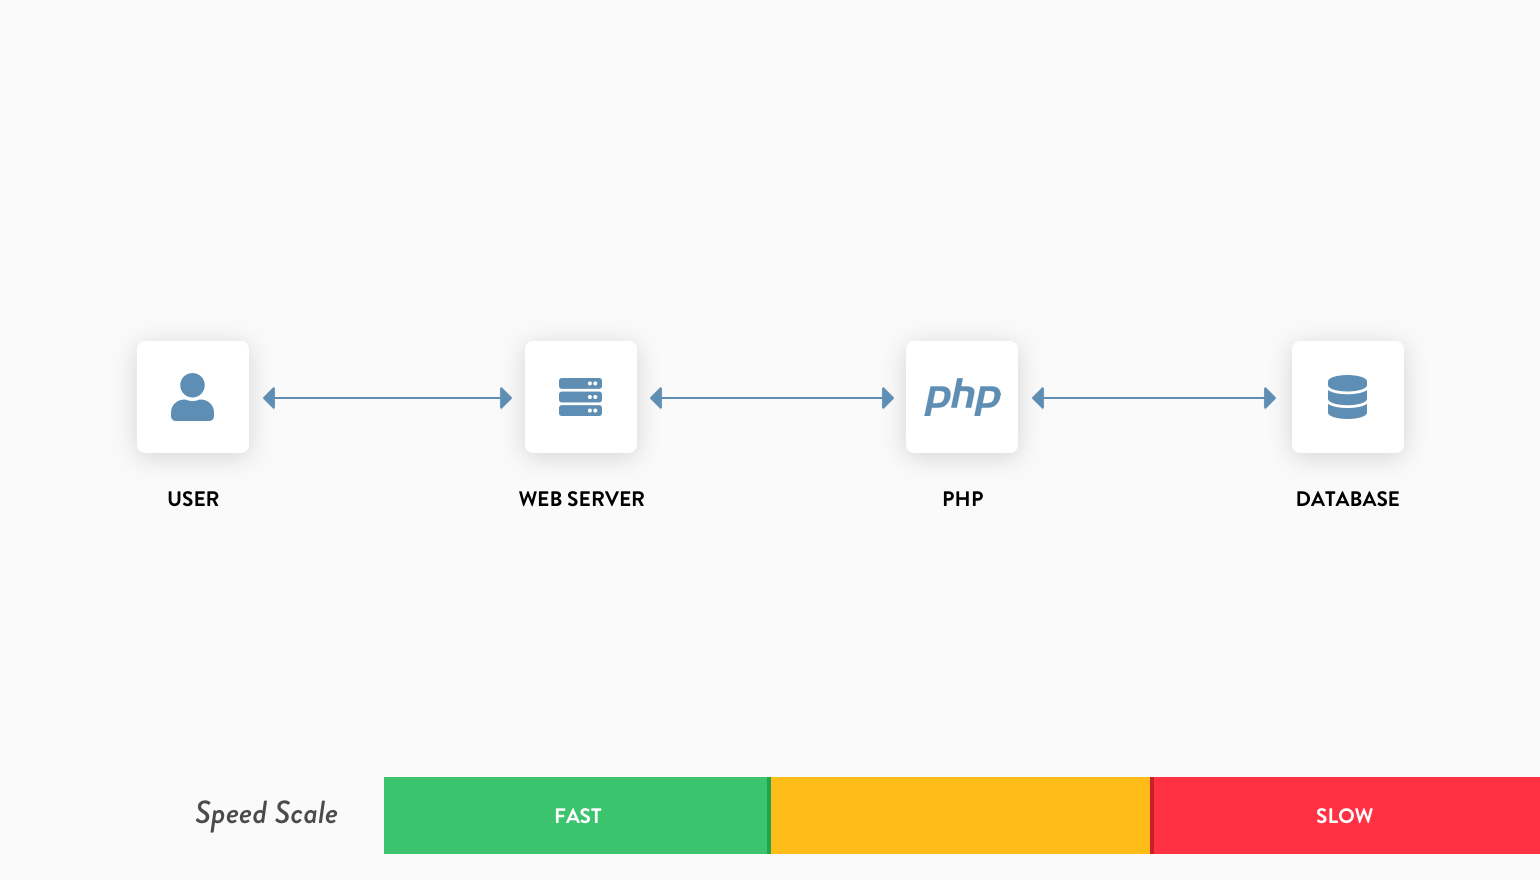
As a general rule, the more moving parts involved with handling a request, the longer a user has to wait for a response, and the more system resources are used. To combat this, caching is often performed in layers, with each layer sitting in front of a moving part. The three prominent layers in WordPress are often broken down to:
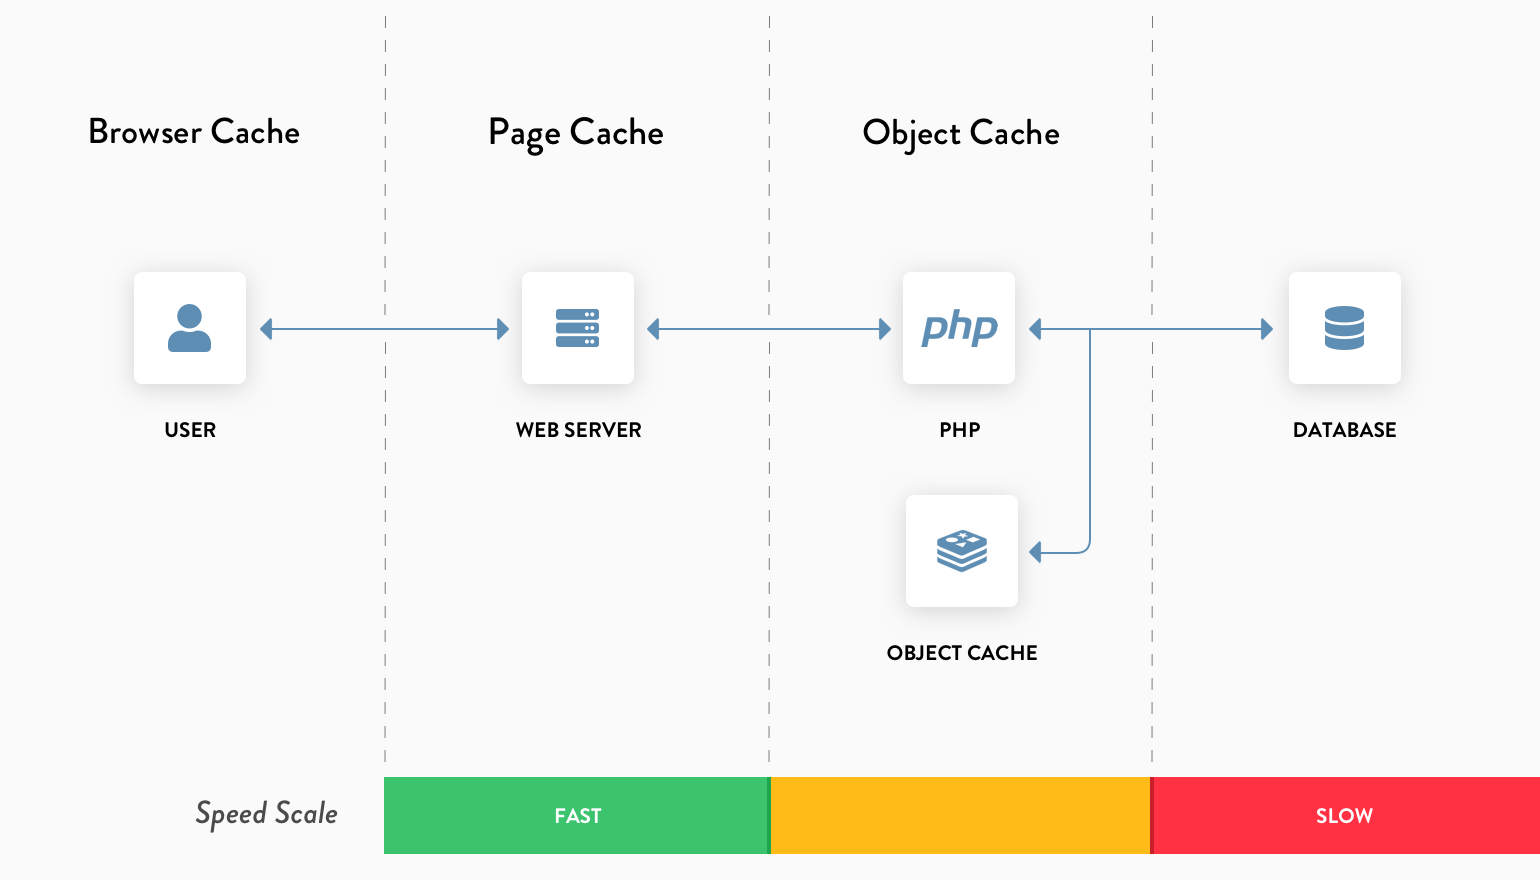
Let’s dive into each of those layers. We’ll work from the outside in, which brings us to browser caching.
Browser Caching
Although browser caching doesn’t necessarily help with application response time or throughput (at least in the realms of WordPress), it is the most important layer when it comes to reducing the amount of data that must be sent from the server to the browser. This can make your site feel much more responsive because static assets such as CSS, JS, and images appear much quicker if they’re cached by the browser.
When it comes to understanding the browser cache, the network tab in your browser’s developer tools is your friend. Let’s take a look at the browser cache in action, by loading the SpinupWP site as an example. The first page load won’t have any assets cached by the browser. (I’ve turned on ‘Disable cache’ to spoof an initial page load).
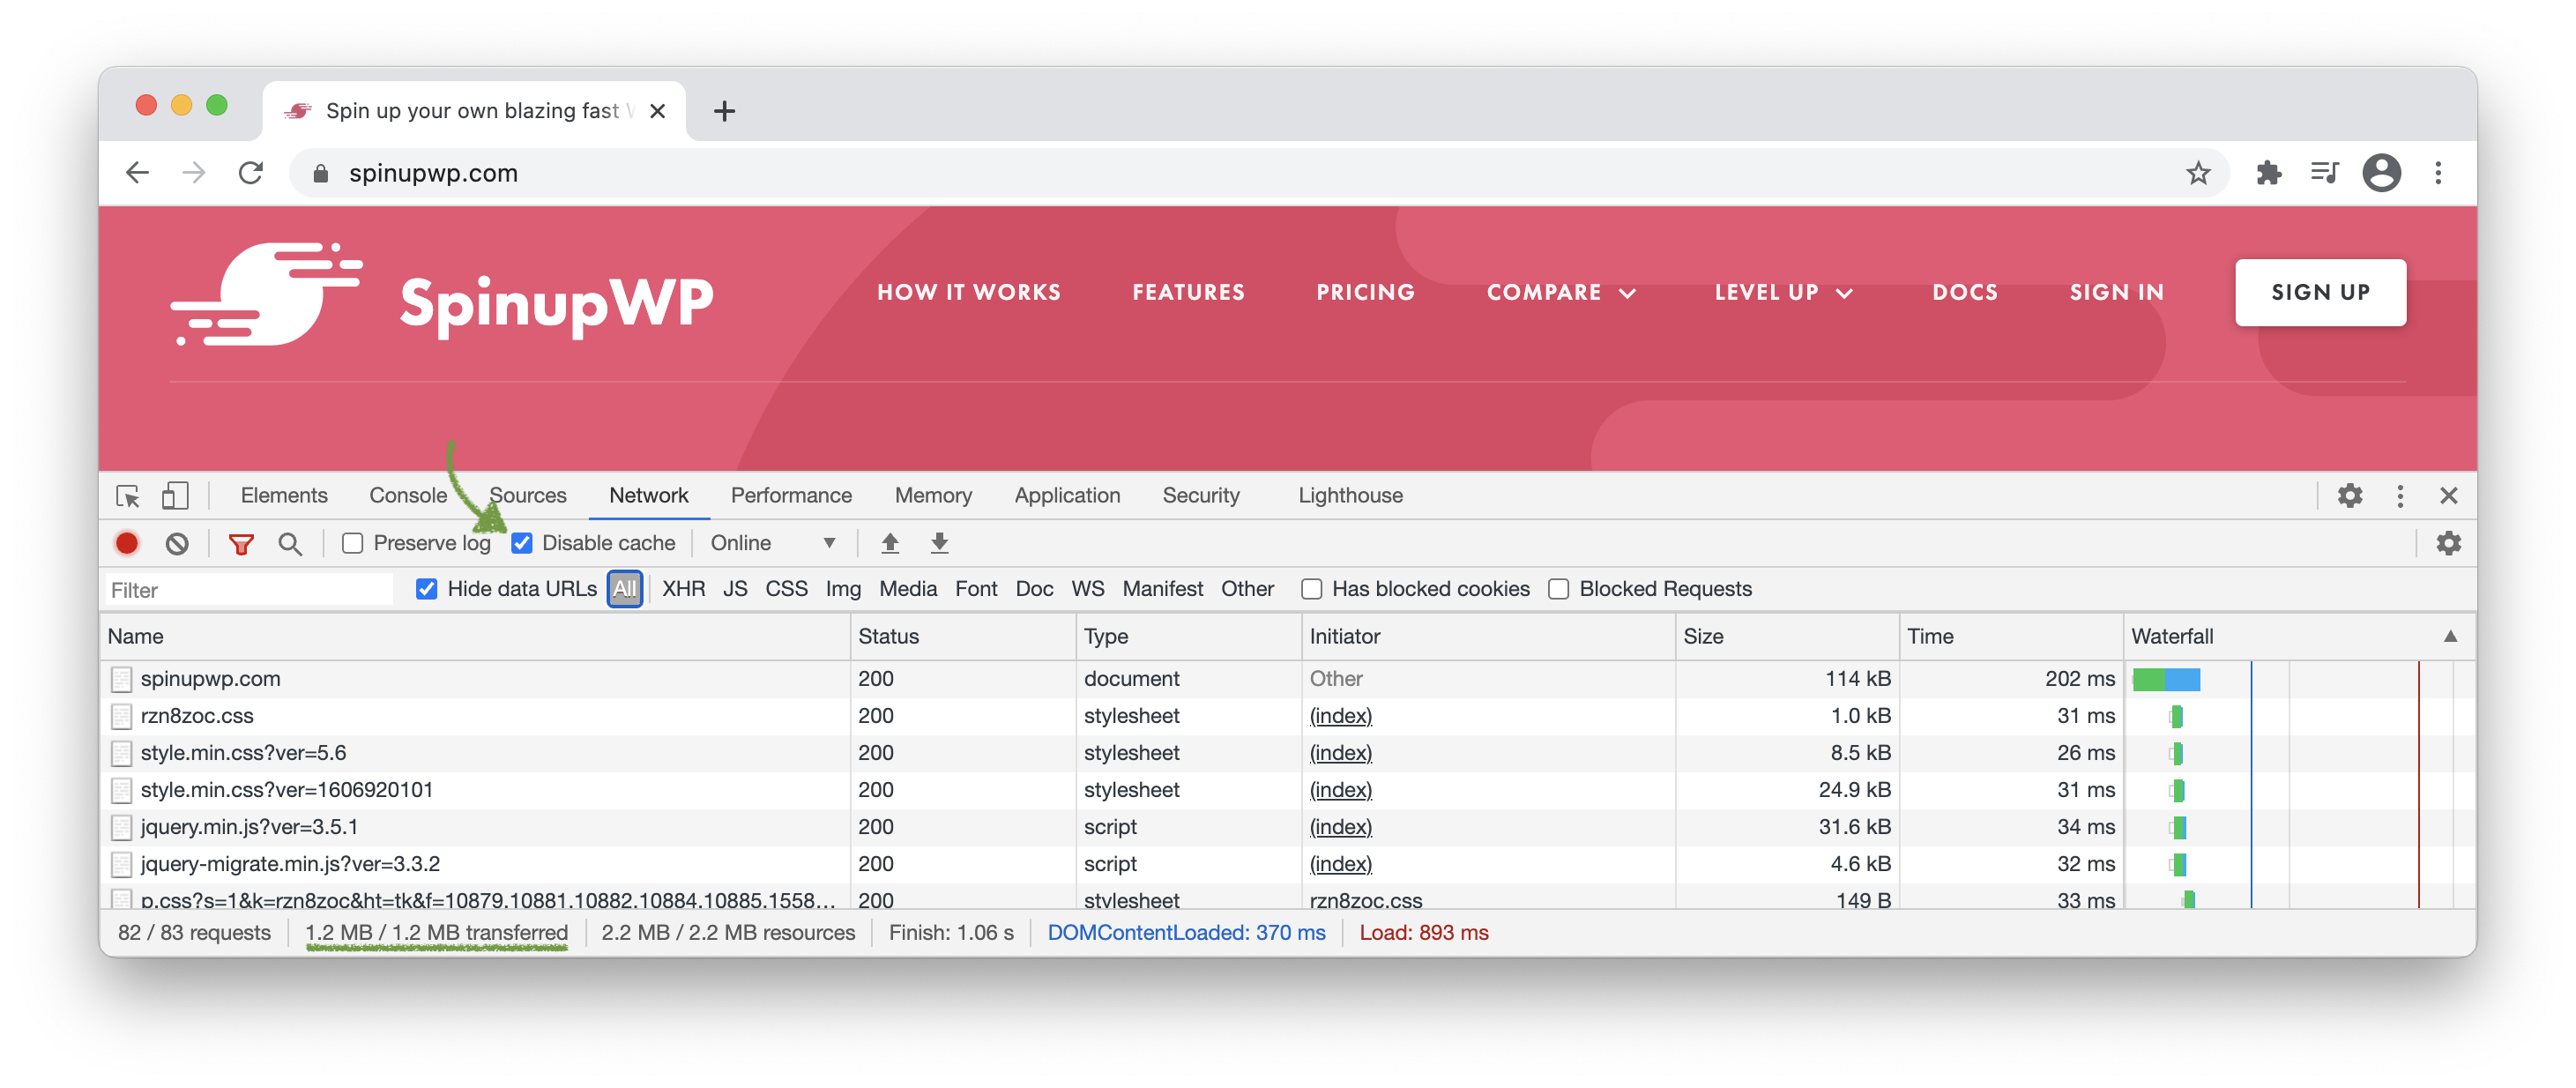
The metrics we’re interested in is the amount of data transferred and the total resources.
1.2 MB / 1.2 MB transferred
2.2 MB / 2.2 MB resources
First, be aware that each metric has two values (1.2 MB / 1.2 MB) because you can filter the results by resource type. This allows you to easily see which type of resource is taking up the majority of the bandwidth.
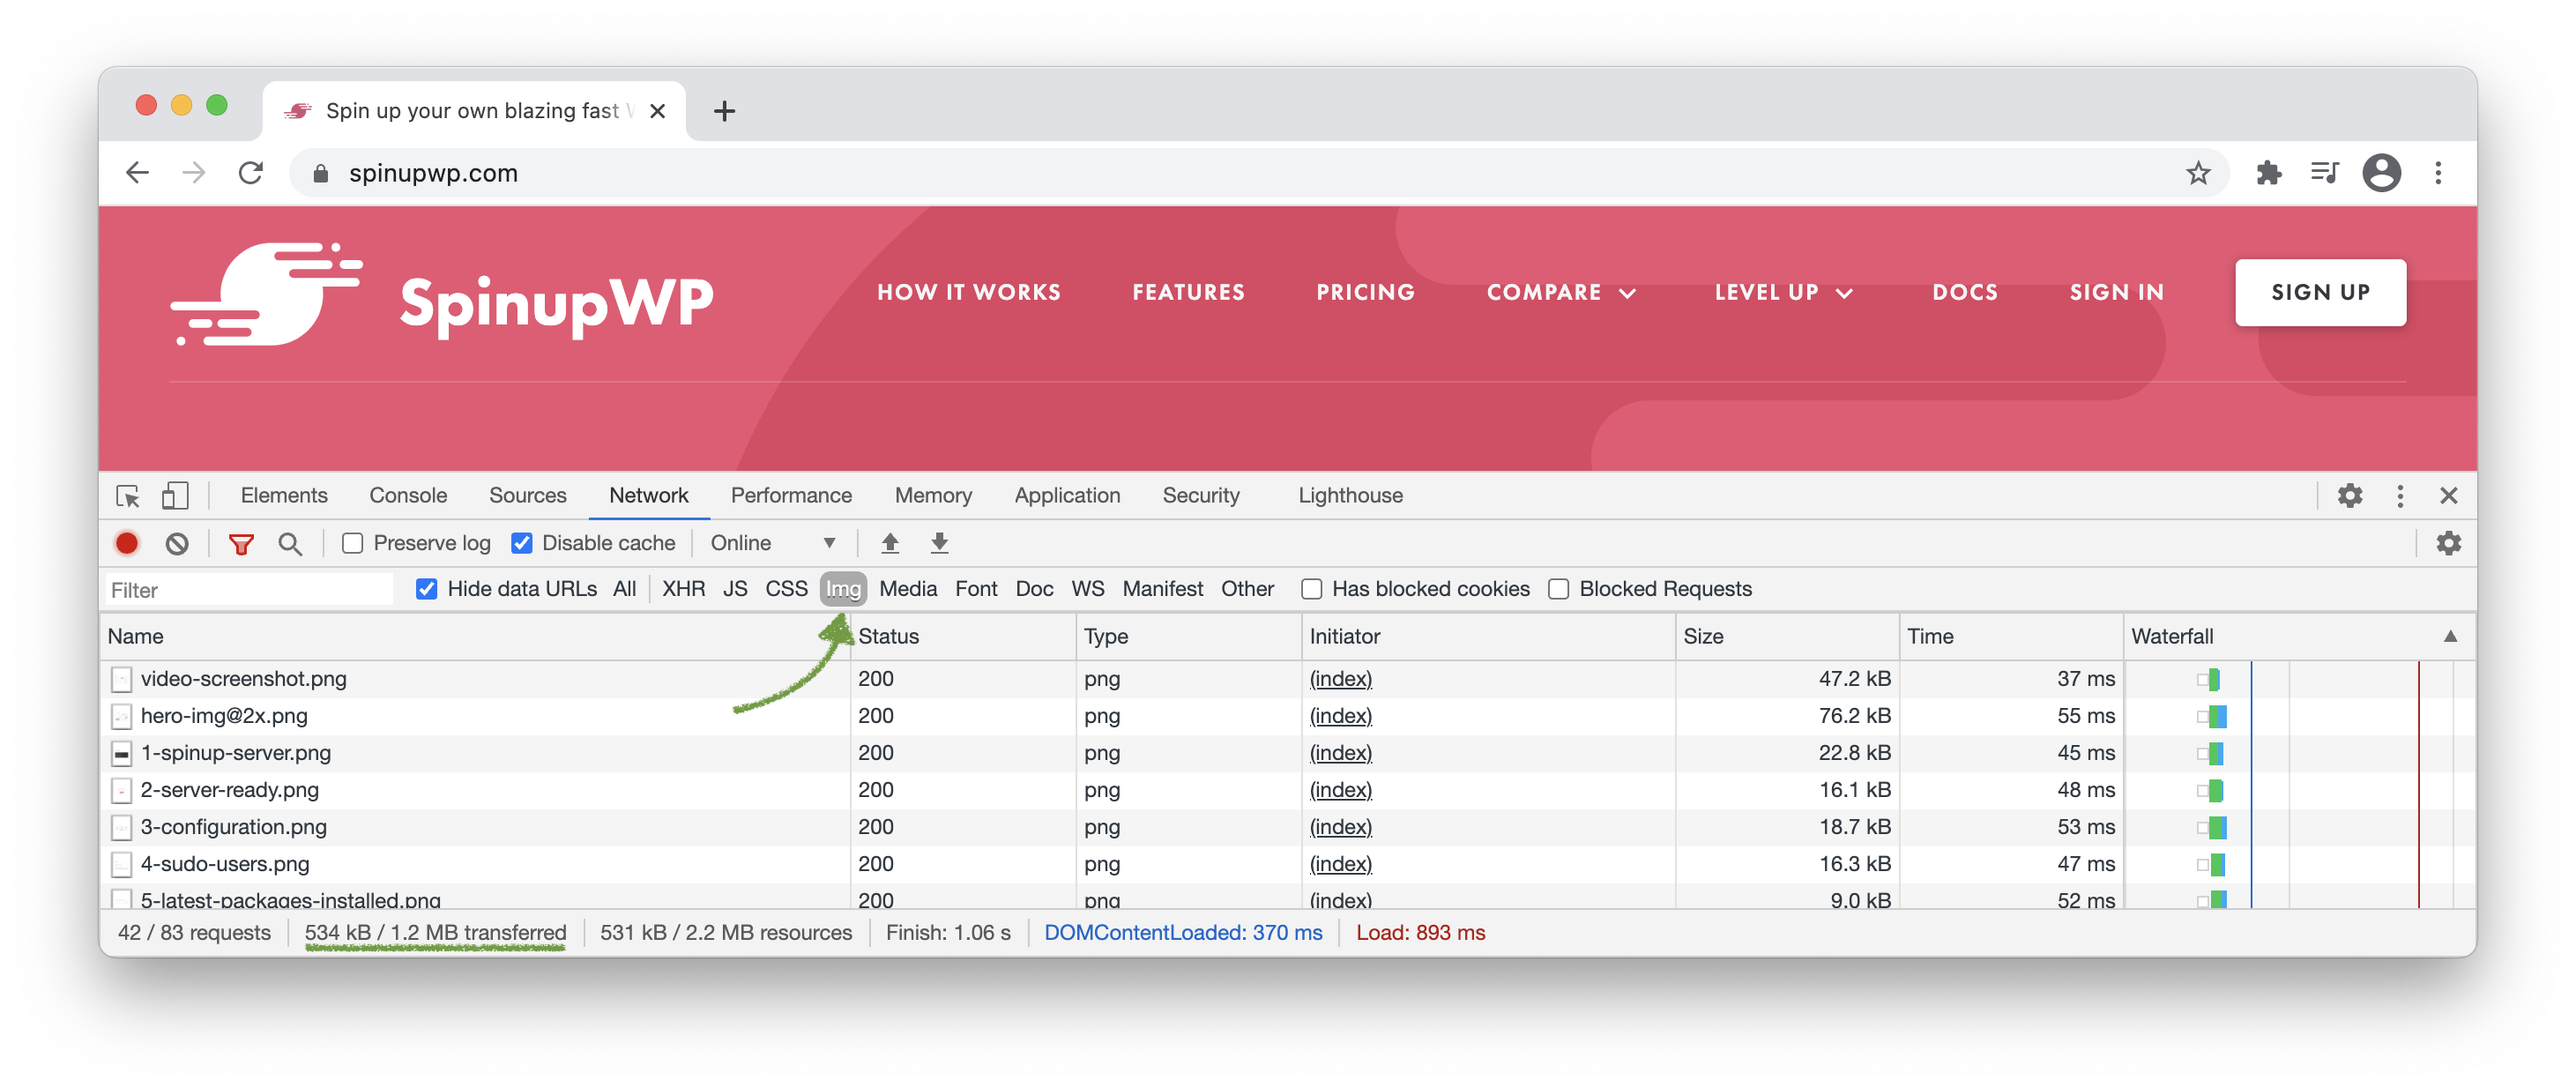
Second, the transferred value should always be lower than the total resources, even if this is the first time the page has been loaded by the browser (or ‘Disable cache’ is enabled), for two reasons:
- Assets which are browser cached aren’t transferred.
- Assets such as HTML, CSS, and JS should be compressed (using Gzip) by the server before being transferred to the browser. They’re then uncompressed by the browser before being displayed to the user.
Therefore, if browser caching is correctly configured, subsequent page loads should transfer less data. You can see this for yourself when we reload the page.
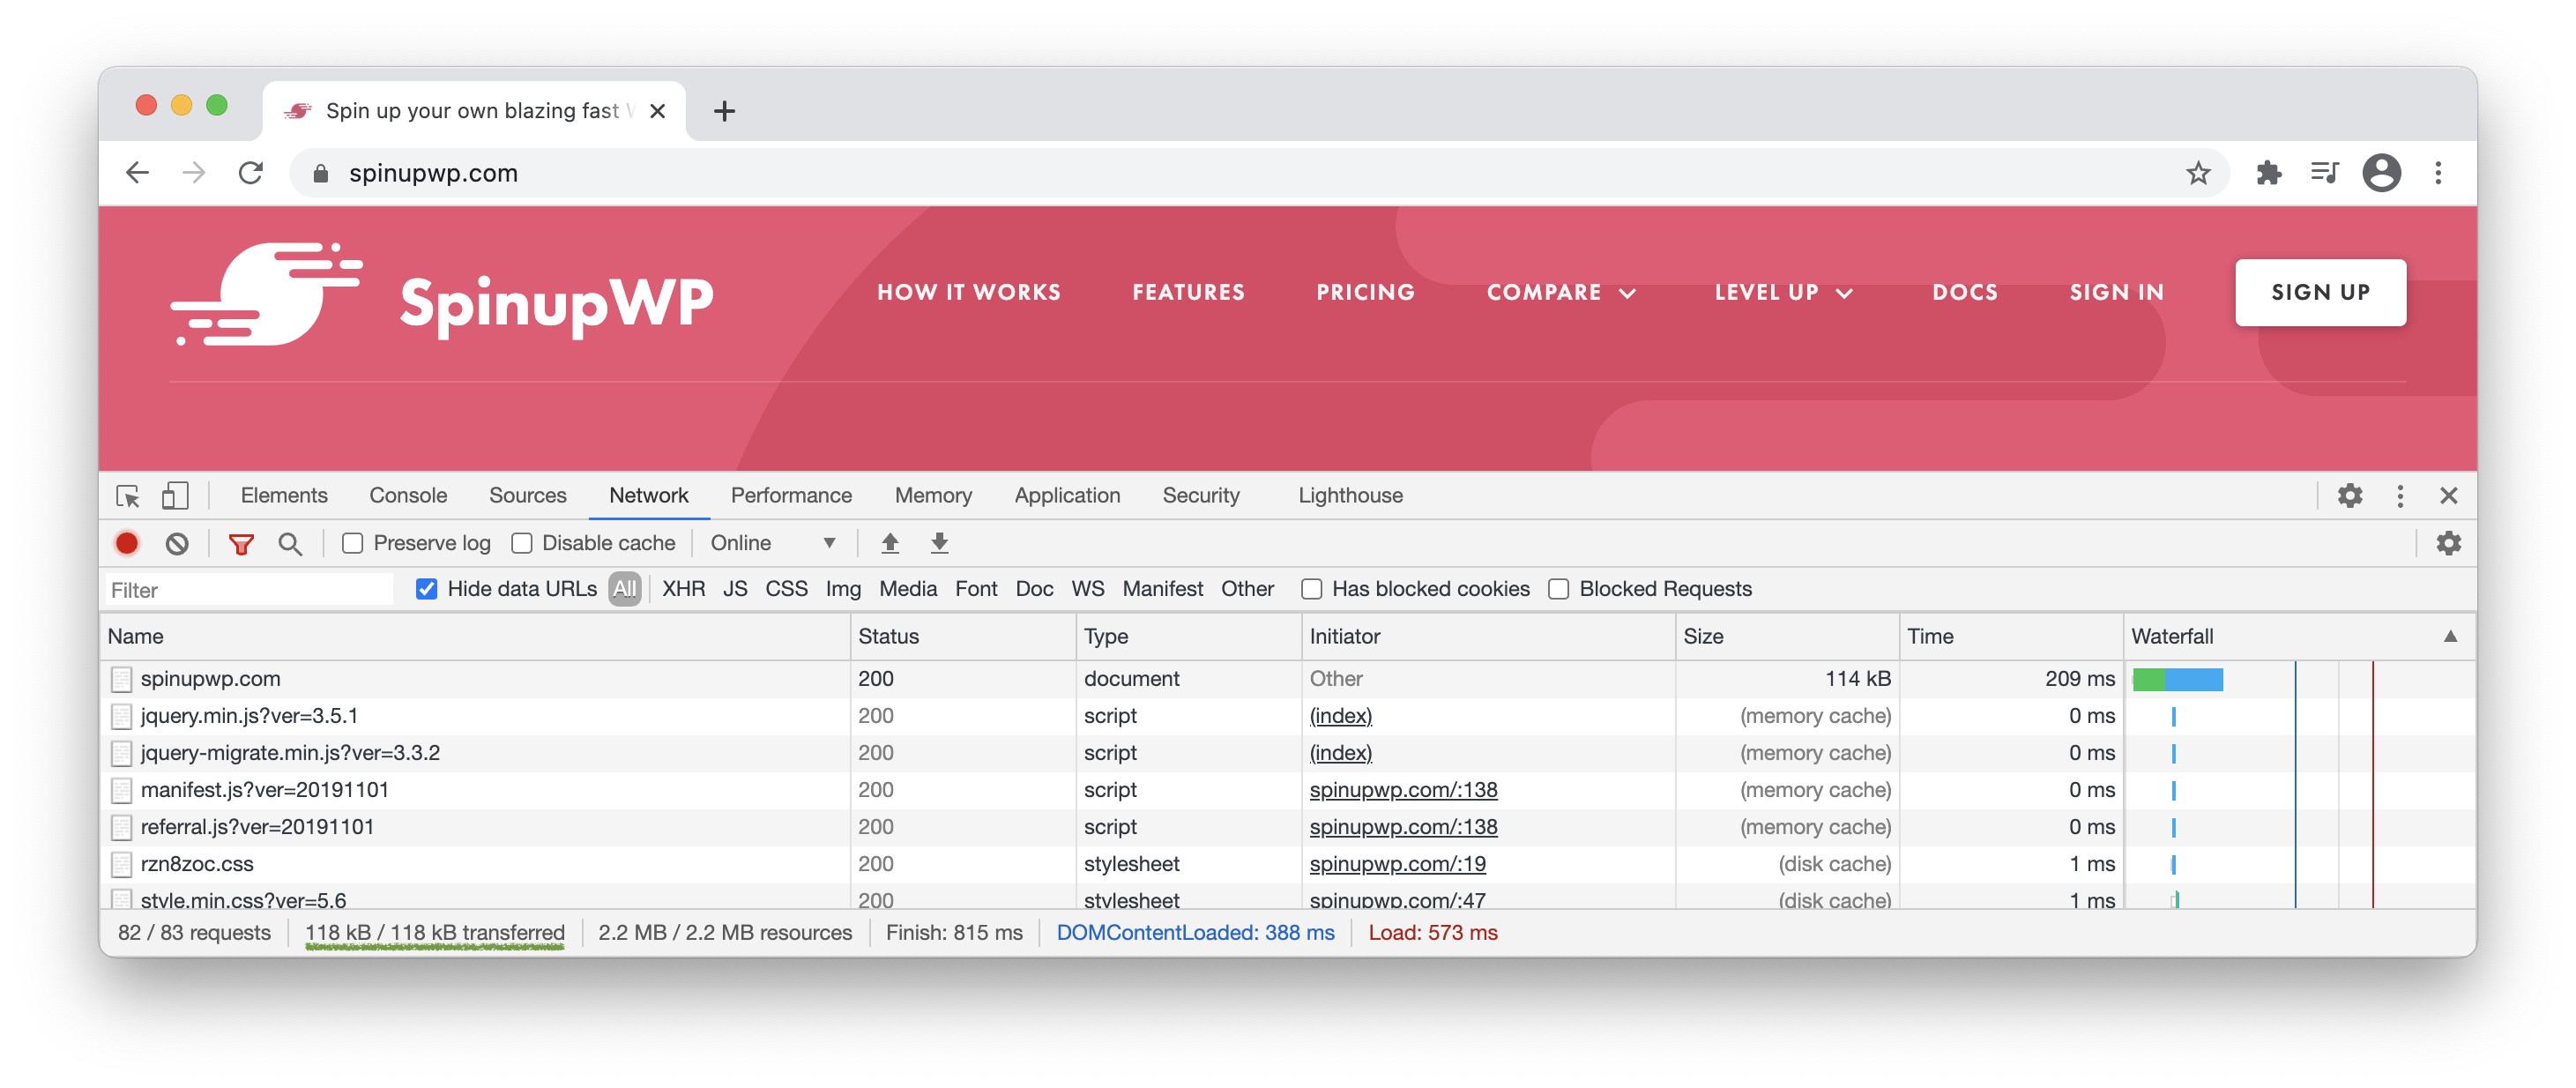
Data transferred has dropped from 1.2 MB to 118 KB, which is a huge saving! You’ll also notice that the load metric has dropped from 893ms to 573ms.
You can configure browser caching behavior by the cache-control and expires headers which are added to the response of static assets by your server. The cache-control header will take precedence over the older expires header. But, both are usually applied to ensure compatibility with some legacy proxy services.
You can check an asset’s headers using the developer tools, or using the cURL command:
$ curl -I https://spinupwp.com/wp-content/themes/spinupwp/assets/images/video-screenshot.png
HTTP/2 200
server: nginx
date: Mon, 18 Jan 2021 21:10:09 GMT
content-type: image/png
content-length: 46753
last-modified: Tue, 13 Oct 2020 12:58:40 GMT
etag: "5f85a480-b6a1"
expires: Tue, 18 Jan 2022 21:10:09 GMT
cache-control: max-age=31536000
Typically, the cache-control header will have a value of max-age=<seconds> which will instruct the browser to cache the file for a maximum of <seconds> and prevent it from being re-downloaded on subsequent requests. In the case above, the file will be cached by the browser for up to 1 year.
Common Gotchas with Browser Caching
1. Cache invalidation is difficult. Once a browser has cached an asset using cache-control: max-age=<seconds> you can’t tell the browser to uncache it, at least not without changing the URL. This is why WordPress adds a version query string to enqueued assets. For example:
https://spinupwp.com/wp/wp-includes/css/dashicons.min.css?ver=5.2.2
2. Website speed test tools such as Pingdom will complain about short-lived expiration headers. Often, these warnings are triggered by external assets like Google Analytics. This is because external services have to use short expiration times to ensure their assets are up to date due to the difficulties with cache invalidation. With a far-future expiration time you would have to update your embed scripts every time Google Analytics changed their code. Ugh!
3. The cache-control and expires headers aren’t the only headers that the browser uses to determine whether a resource should be fetched from the server. For example, once the duration specified by cache-control: max-age=<seconds> has elapsed the etag header will be used. This contains a validation token (similar to an MD5 hash of the requested resource), which is compared to the token of the resource stored on the server. If the etag value is the same, the resource returns a “304 Not Modified” response. This tells the browser that the cached resource hasn’t changed and that it should renew the expiration time specified in cache-control: max-age=<seconds>. HTTP caching is an entire subject in itself, but you can read more about it here.
Page Caching
Page caching is going to give you the most bang for the buck when it comes to improving both application response time and throughput. A page cache essentially turns WordPress (a database-driven CMS) into a static HTML site by taking both PHP and MySQL out of the equation when it comes to handling a request.
To demonstrate how significant an impact page caching can have, I’m going to benchmark a clean installation of WordPress 5.6.2 using ApacheBench. In these tests I’m using SpinupWP to provision a 8 GB, 4 vCPUs DigitalOcean Droplet tuned for hosting WordPress sites. The uncached results are for WordPress with no caching configured (except PHP OPcache, using PHP 7.4 default values). The cached results have SpinupWP’s one-click page cache enabled.
Let’s start with requests per second (higher is better), which translates to:
It increases application throughput. Meaning, your site can handle more traffic.
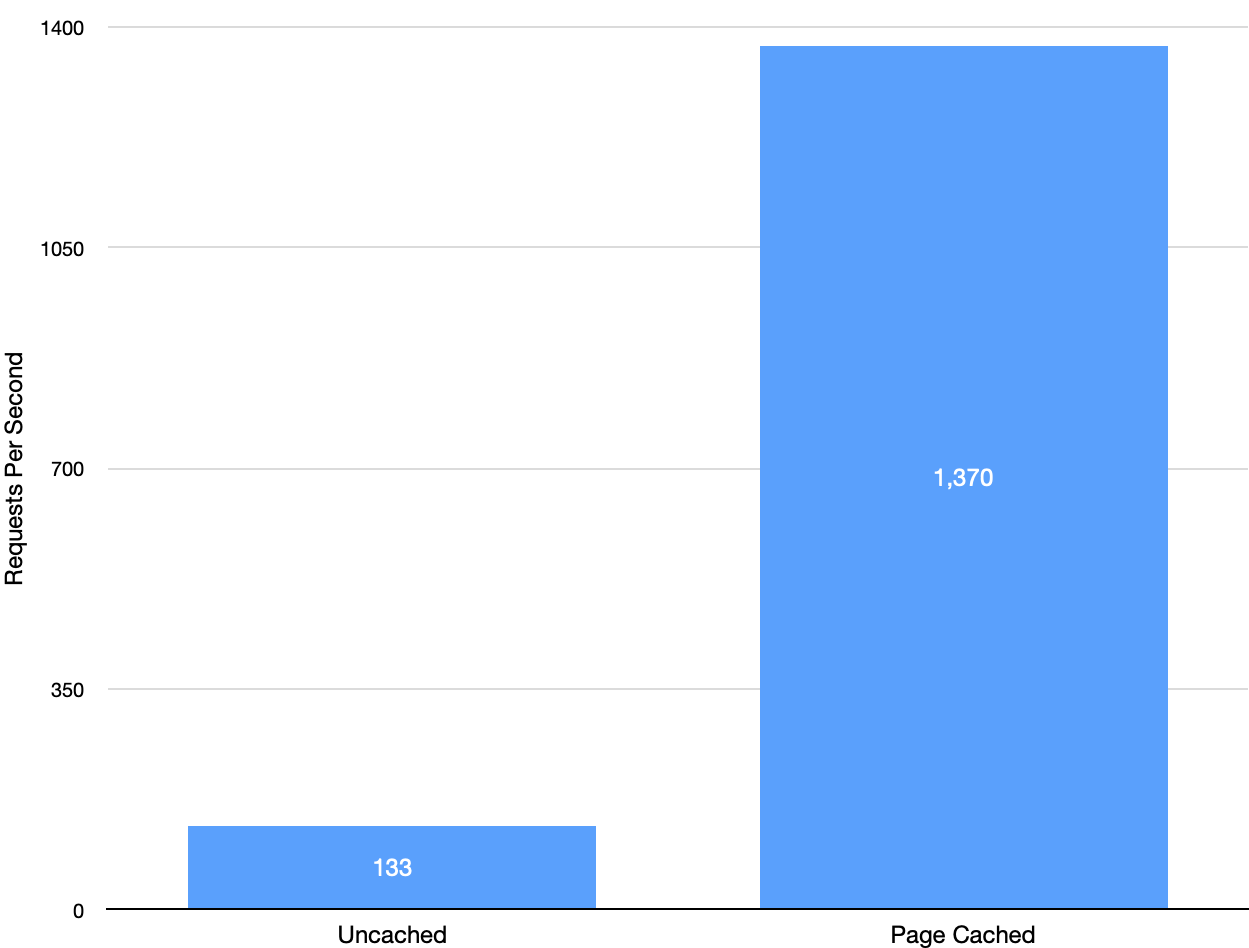
That’s a 10x increase in requests per second, which is awesome! But, a high requests per second doesn’t mean much if those requests are slow to complete. That’s why it’s important to also measure the average response time (lower is better), which brings us to:
It improves application performance. For WordPress sites, this means that your site loads faster.
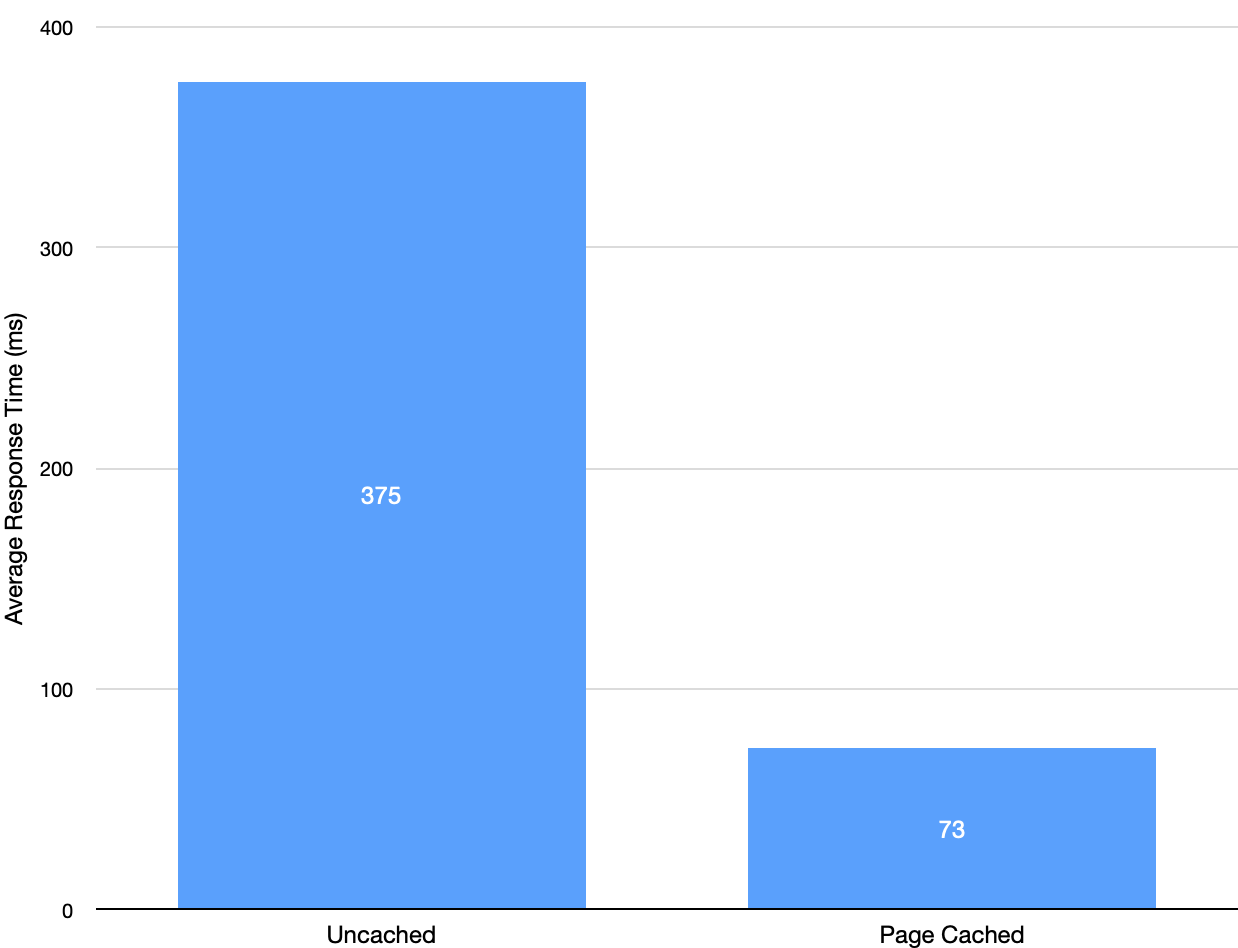
Average response time is five times faster when the page cache is configured. This is pretty remarkable considering 10x the amount of requests per second are being handled.
Common Gotchas with Page Caching
1. Page caching is extremely difficult when sites display personalized content like e-commerce sites or are highly dynamic like forums. Often, the page cache will need to be completely disabled or specific pages like the /checkout will need to bypass the cache.
2. Cache invalidation can be tricky depending on how it’s implemented. Due to the dynamic nature of WordPress, it’s difficult to determine which pages should be purged from the cache when content is updated (especially when archives, pagination and widgets are involved). This is why purging the entire page cache is often the preferred approach when content has changed.
3. Using multiple page cache solutions won’t improve performance. In fact, having multiple page caching solutions is highly discouraged because it can cause cache incoherency (different versions of your site stored in each cache) and make cache invalidation difficult.
4. Page caching is usually disabled for logged in users, which is why object caching (below) is still advisable.
Object Caching
As mentioned previously, not all pages can be page cached. This is especially true of e-commerce and membership sites, which often display personalized content. It’s also true of the WordPress admin area. If such dynamic pages were page cached, users would see personalized content not relevant to them.
WordPress has object caching built-in, which allows data such as database queries to be stored in memory. This is how multiple calls to functions such as get_posts only results in a single database query. However, the object cache is non-persistent by default (meaning it doesn’t live beyond a request). Luckily, WordPress can be integrated with a persistent data store such as Redis, which is crucial for scaling dynamic pages. The object cache sits between PHP and the database which speeds up PHP execution time and reduces the load on the database by caching queries in memory. You can see the impact an object cache has by installing the Query Monitor plugin. Loading the WooCommerce cart page without object caching enabled results in 32 database queries:

With object caching enabled, this drops to 2 database queries and reduces page generation time from 0.085s to 0.053s:

These tests were performed using PHP 7.3, a clean install of WordPress 5.2.2, WooCommerce 3.6.4 and the Storefront theme.
Common Gotchas
1. Additional server software such as Redis or Memcached is required to make the object cache persistent. This should be taken care of if you’re using a good WordPress hosting provider, or you can install it yourself if you manage your own server.
2. The object cache doesn’t completely remove the reliance on the database, which is often the biggest bottleneck in WordPress. This is because the SQL queries to build the post index will always be executed as the results are not cached.
WordPress Caching Plugins
Popular caching plugins like WP Rocket, W3 Total Cache or WP Super Cache are a common way to add caching functionality to your site. However, you might not need to use a plugin at all. A good WordPress hosting provider will take care of caching for you at the server level. If you’re managing your own server, you can follow our server setup guide to learn how to set it up caching properly. If you do choose to use a plugin, take a look at our guide on the top WordPress cache plugins and how to turbocharge them with Nginx.
What about Cloudflare?
If you are using Cloudflare, you may be wondering if the different caching layers are still necessary. To answer this, we need to understand that by default Cloudflare will only cache your static assets (CSS, JavaScript, images) on a CDN.
This means that when a visitor comes to your site, the cached version of those assets will be downloaded from the server on the CDN network that is closest to their location. This reduces the load time for downloading the site assets.
A CDN like Cloudflare can be used in addition to the other caching layers. Although page caching and object caching are still important to optimize your WordPress website. For more details, check out our article on why A CDN Isn’t a Silver Bullet for Performance.
Note that it is possible to configure page rules in Cloudflare for full page caching. However, the option to bypass the cache based on cookies is only available for Business and Enterprise plans. Being able to bypass the cache based on cookies is critical for a WordPress website in order to avoid serving cached responses to logged in users, or for other dynamic content like a shopping cart on an e-commerce website. Cloudflare does offer Automatic Platform Optimization for WordPress which can solve these problems at a cost of $5/month per domain for users that are on the free plan.
That’s All Folks
I’ve only scratched the surface of caching as it relates to WordPress. Hopefully, you have a better understanding of how the various caching layers work. If you would like to dive deeper, I recommend checking out HTTP Caching which gives more insight into browser caching. WordPress at Scale is also an excellent resource for learning more about WordPress specific performance.
Still not sure about WordPress caching? Ask away in the comments below.


