In chapter 3 you learned how to add HTTPS sites to your server, but there is more that we can do to improve the security of our server. In this chapter, we’ll continue strengthening our server’s security by implementing best practices that protect both, network access and web services, from common attack vectors. This includes hardening SSH access, improving TLS configuration, configuring browser security headers, and reducing the risk of attacks such as XSS, Clickjacking, and MIME sniffing.
SSH Hardening
Disabling PermitRootLogin and PasswordAuthentication already goes a long way towards protecting your server from unauthorized access. However, bad actors can still attempt to compromise your server through other means such as exploiting weak key exchange algorithms and ciphers. To help us protect ourselves against these sorts of exploits, we’ll use SSH-Audit to scan our server for potential SSH vulnerabilities.

A Standard Audit will suffice for our purposes, but you may consider using a custom Policy Audit should your environment require it.

As you can see, our server didn’t do too well based on the scan. Thankfully, SSH-Audit also provides us with all the necessary steps to address the issues highlighted in the audit. However, for your convenience, we’ll go through those steps below.
Start by removing the default SSH host keys from the server:
sudo rm /etc/ssh/ssh_host_*
Then, re-generate the server’s ED25519 and RSA SSH host keys:
sudo ssh-keygen -t ed25519 -f /etc/ssh/ssh_host_ed25519_key -N ""
sudo ssh-keygen -t rsa -b 4096 -f /etc/ssh/ssh_host_rsa_key -N ""
Next, remove the small Diffie-Hellman keys from the moduli file:
sudo awk '$5 >= 3071' /etc/ssh/moduli | sudo tee /etc/ssh/moduli.safe > /dev/null
sudo mv /etc/ssh/moduli.safe /etc/ssh/moduli
Now, create a new SSH configuration file inside /etc/ssh/sshd_config.d/:
sudo nano /etc/ssh/sshd_config.d/ssh_hardening.conf
And add the following lines to it:
# Restrict key exchange, cipher, and MAC algorithms, as per ssh-audit.com hardening guide.
KexAlgorithms sntrup761x25519-sha512@openssh.com,gss-curve25519-sha256-,curve25519-sha256,curve25519-sha256@libssh.org,diffie-hellman-group18-sha512,diffie-hellman-group-exchange-sha256,gss-group16-sha512-,diffie-hellman-group16-sha512
Ciphers chacha20-poly1305@openssh.com,aes256-gcm@openssh.com,aes256-ctr,aes192-ctr,aes128-gcm@openssh.com,aes128-ctr
MACs hmac-sha2-512-etm@openssh.com,hmac-sha2-256-etm@openssh.com,umac-128-etm@openssh.com
RequiredRSASize 3072
HostKeyAlgorithms sk-ssh-ed25519-cert-v01@openssh.com,ssh-ed25519-cert-v01@openssh.com,rsa-sha2-512-cert-v01@openssh.com,rsa-sha2-256-cert-v01@openssh.com,sk-ssh-ed25519@openssh.com,ssh-ed25519,rsa-sha2-512,rsa-sha2-256
CASignatureAlgorithms sk-ssh-ed25519@openssh.com,ssh-ed25519,rsa-sha2-512,rsa-sha2-256
GSSAPIKexAlgorithms gss-curve25519-sha256-,gss-group16-sha512-
HostbasedAcceptedAlgorithms sk-ssh-ed25519-cert-v01@openssh.com,ssh-ed25519-cert-v01@openssh.com,rsa-sha2-512-cert-v01@openssh.com,rsa-sha2-256-cert-v01@openssh.com,sk-ssh-ed25519@openssh.com,ssh-ed25519,rsa-sha2-512,rsa-sha2-256
PubkeyAcceptedAlgorithms sk-ssh-ed25519-cert-v01@openssh.com,ssh-ed25519-cert-v01@openssh.com,rsa-sha2-512-cert-v01@openssh.com,rsa-sha2-256-cert-v01@openssh.com,sk-ssh-ed25519@openssh.com,ssh-ed25519,rsa-sha2-512,rsa-sha2-256
Lastly, restart the service for the changes to take effect:
sudo systemctl restart ssh.service
Running the scan again produces the following result:

Because of a bug in OpenSSH, 2048-bit DH moduli will still be used in some limited circumstances. Only a maximum score of 95% is possible.
Nginx Hardening
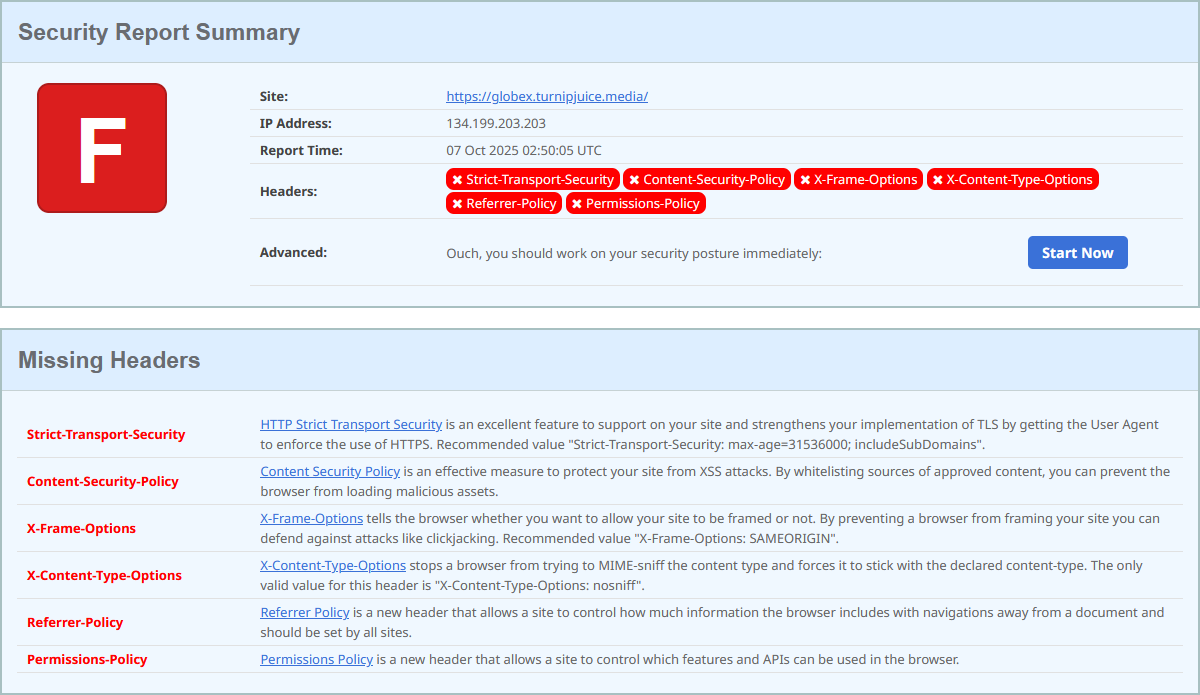
Let’s first figure out where we’re at and see what we have to improve by having a couple of free security scanning services scan our site. You can check the status of your site’s security headers using SecurityHeaders.com, which is an excellent free resource created by cybersecurity expert Scott Helme. Our site did not do so well here either:

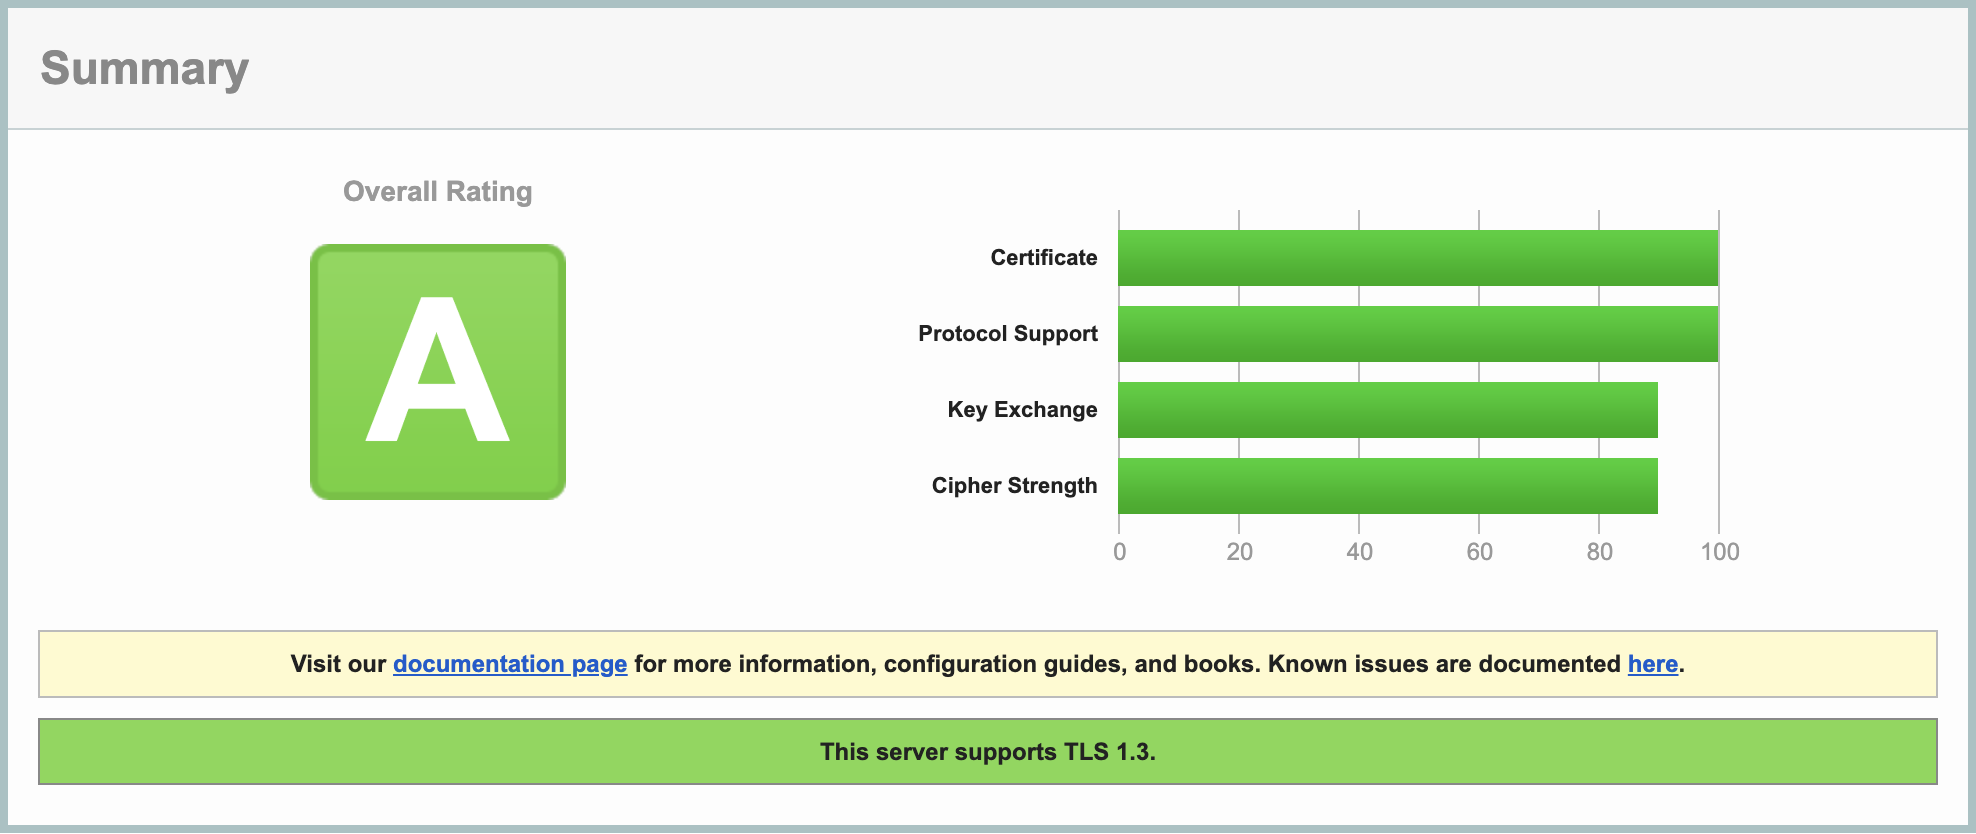
The SSL Server Test by Qualys SSL Labs gives us a good idea of how we might improve our SSL configuration. Our site did pretty well here, but there’s still room for improvement:

SSL Hardening
Although your site is configured to only handle HTTPS traffic via your SSL certificate from Let’s Encrypt, it still allows the client to attempt further HTTP connections. Adding the Strict-Transport-Security header to the server response will ensure all future connections enforce HTTPS. An article by Scott Helme gives a thorough overview of the Strict-Transport-Security header.
Let’s configure Nginx by opening the main nginx.conf file:
sudo nano /etc/nginx/nginx.conf
Add the following directive inside the http block (under the Cache Settings is a good spot):
##
# Security Headers
##

add_header Strict-Transport-Security "max-age=31536000; includeSubdomains";
You may be wondering why the 301 redirect is still needed if this header automatically enforces HTTPS traffic: unfortunately the header isn’t supported by IE10 and below.
Now let’s update our SSL configuration as per the recommendations of Mozilla’s SSL Configuration Generator on the “Intermediate” setting. Find the ssl_protocols directive and replace that line with the following three lines:
ssl_protocols TLSv1.2 TLSv1.3;
ssl_ciphers ECDHE-ECDSA-AES128-GCM-SHA256:ECDHE-RSA-AES128-GCM-SHA256:ECDHE-ECDSA-AES256-GCM-SHA384:ECDHE-RSA-AES256-GCM-SHA384:ECDHE-ECDSA-CHACHA20-POLY1305:ECDHE-RSA-CHACHA20-POLY1305:DHE-RSA-AES128-GCM-SHA256:DHE-RSA-AES256-GCM-SHA384:DHE-RSA-CHACHA20-POLY1305;
ssl_dhparam /etc/nginx/dhparam;
This ensures we aren’t allowing the use of old, insecure protocols and ciphers.
Now find the ssl_prefer_server_ciphers directive and update it to off:
ssl_prefer_server_ciphers off;
This allows the client to choose the most performant cipher suite for their hardware configuration from our list of supported ciphers above.
Hit CTR + X followed by Y to save the file.
Now let’s download that dhparam file that we referenced in the SSL configuration update above and save it to the server:
sudo sh -c 'curl https://ssl-config.mozilla.org/ffdhe4096.txt > /etc/nginx/dhparam'
It is a bit strange to be downloading a key from the web instead of generating our own, but there’s a good discussion that details why this is ok. Suffice it to say that you should use this key file.
Before reloading the Nginx configuration, ensure there are no syntax errors.
sudo nginx -t
If no errors are shown, reload the configuration.
sudo systemctl reload nginx.service
SSL Performance
HTTPS connections are a lot more resource hungry than regular HTTP connections. This is due to the additional handshake procedure required when establishing a connection. However, it’s possible to cache the SSL session parameters, which will avoid the SSL handshake altogether for subsequent connections. Just remember that security is the name of the game, so you want clients to re-authenticate often. A happy medium of 10 minutes is usually a good starting point.
Open the main nginx.conf file:
sudo nano /etc/nginx/nginx.conf
Add the following directives within the http block under the SSL Settings:
ssl_session_cache shared:SSL:10m;
ssl_session_timeout 1d;
ssl_session_tickets off;
Before reloading the Nginx configuration, ensure there are no syntax errors.
sudo nginx -t
If no errors are shown, reload the configuration.
sudo systemctl reload nginx.service
Cross-site Scripting (XSS)
The most effective way to deal with XSS is to ensure that you correctly validate and sanitize all user input in your code, including that within the WordPress admin areas. But most input validation and sanitization is out of your control when you consider third-party themes and plugins. You can however reduce the risk of vulnerability to XSS attacks by configuring Nginx to provide an additional response header.
Let’s assume an attacker has managed to embed a malicious JavaScript file into the source code of your site or web application, maybe through a comment form or something similar. By default, the web browser will unknowingly load this external file and allow its contents to execute. Enter the Content Security Policy header, which allows you to define a whitelist of sources that are approved to load assets (JS, CSS, etc.). If the script isn’t on the approved list, it doesn’t get loaded.
Creating a Content Security Policy can require some trial and error, as you need to be careful not to block assets that should be loaded such as those provided by Google or other third party vendors. As such, we’ll define a fairly relaxed policy at the server level and override it on a per-site basis as needed.
Open the main Nginx configuration file:
sudo nano /etc/nginx/nginx.conf
Add the following to the Security Headers section inside the http block:
add_header Content-Security-Policy "default-src 'self' https: data: 'unsafe-inline' 'unsafe-eval';" always;
This will block any non HTTPS assets from loading.
As an example of an override, you could add the following to the server block in your site’s configuration file that will only allow the current domain and a few sources from Google and WordPress.org:
sudo nano /etc/nginx/sites-available/globex.turnipjuice.media
add_header Content-Security-Policy "default-src 'self' https://*.google-analytics.com https://*.googleapis.com https://*.gstatic.com https://*.gravatar.com https://*.w.org data: 'unsafe-inline' 'unsafe-eval';" always;
While we’re on the topic of XSS protection, you may come across the X-XSS-Protection header in older security guides or configuration examples. In the past, it was common to see this header configured as follows:
X-XSS-Protection "1; mode=block"
For this reason, it’s important to explicitly disable the X-XSS-Protection header to prevent legacy browsers from attempting to apply outdated or unsafe filtering mechanisms. You can do this by adding the following line to the Security Headers section of the Nginx configuration:
add_header X-XSS-Protection "0" always;
This ensures that the header is set to 0, effectively disabling the deprecated filter and avoiding potential security risks.
X-XSS-Protection header, see the resources below: Clickjacking
Clickjacking is an attack which fools the user into performing an action which they did not intend to, and is commonly achieved through the use of iframes. An article by Troy Hunt has a thorough explanation of clickjacking attacks.
The most effective way to combat this attack vector is to completely disable frame embedding from third party domains. To do this, add the following directive below the X-XSS-Protection header:
add_header X-Frame-Options "SAMEORIGIN" always;
This will prevent all external domains from embedding your site directly into their own through the use of the iframe tag:
<iframe src="http://mydomain.com"</iframe>
MIME Sniffing
MIME sniffing can expose your site to attacks such as “drive-by downloads.” The X-Content-Type-Options header counters this threat by ensuring only the MIME type provided by the server is honored. An article by Microsoft explains MIME sniffing in detail.
To disable MIME sniffing add the following directive:
add_header X-Content-Type-Options "nosniff" always;
Referrer Policy
The Referrer-Policy header allows you to control which information is included in the Referrer header when navigating from pages on your site. While referrer information can be useful, there are cases where you may not want the full URL passed to the destination server, for example, when navigating away from private content (think membership sites).
In fact, since WordPress 4.9 any requests from the WordPress dashboard will automatically send a blank referrer header to any external destinations. Doing so makes it impossible to track these requests when navigating away from your site (from within the WordPress dashboard), which helps to prevent broadcasting the fact that your site is running on WordPress by not passing /wp-admin to external domains.
We can take this a step further by restricting the referrer information for all pages on our site, not just the WordPress dashboard. A common approach is to pass only the domain to the destination server, so instead of:
https://myawesomesite.com/top-secret-url
The destination would receive:
https://myawesomesite.com
You can achieve this using the following policy:
add_header Referrer-Policy "strict-origin-when-cross-origin" always;
A full list of available policies can be found over at MDN.
Permissions Policy
The Permissions-Policy header allows a site to enable and disable certain browser features and APIs. This allows you to manage which features can be used on your own pages and anything that you embed.
A Permissions Policy works by specifying a directive and an allowlist. The directive is the name of the feature you want to control and the allowlist is a list of origins that are allowed to use the specified feature. MDN has a full list of available directives and allowlist values. Each directive has its own default allowlist, which will be the default behavior if they are not explicitly listed in a policy.
You can specify several features at the same time by using a comma-separated list of policies. In the following example, we allow geolocation across all contexts, we restrict the camera to the current page and the specified domain, and we block the microphone across all contexts:
add_header Permissions-Policy "geolocation=*, camera=(self 'https://example.com'), microphone=()";
Download the complete set of Nginx config files including these security directives
That’s all of the suggested security headers implemented. Save and close the file by hitting CTRL+X followed by Y. Before reloading the Nginx configuration, ensure there are no syntax errors.
sudo nginx -t
If no errors are shown, reload the configuration.
sudo systemctl reload nginx.service
After reloading your site you may see a few console errors related to external assets. If so, adjust your Content-Security-Policy as required.
Security Audit Results
Now if we rescan our site’s security headers, we get a much better result:

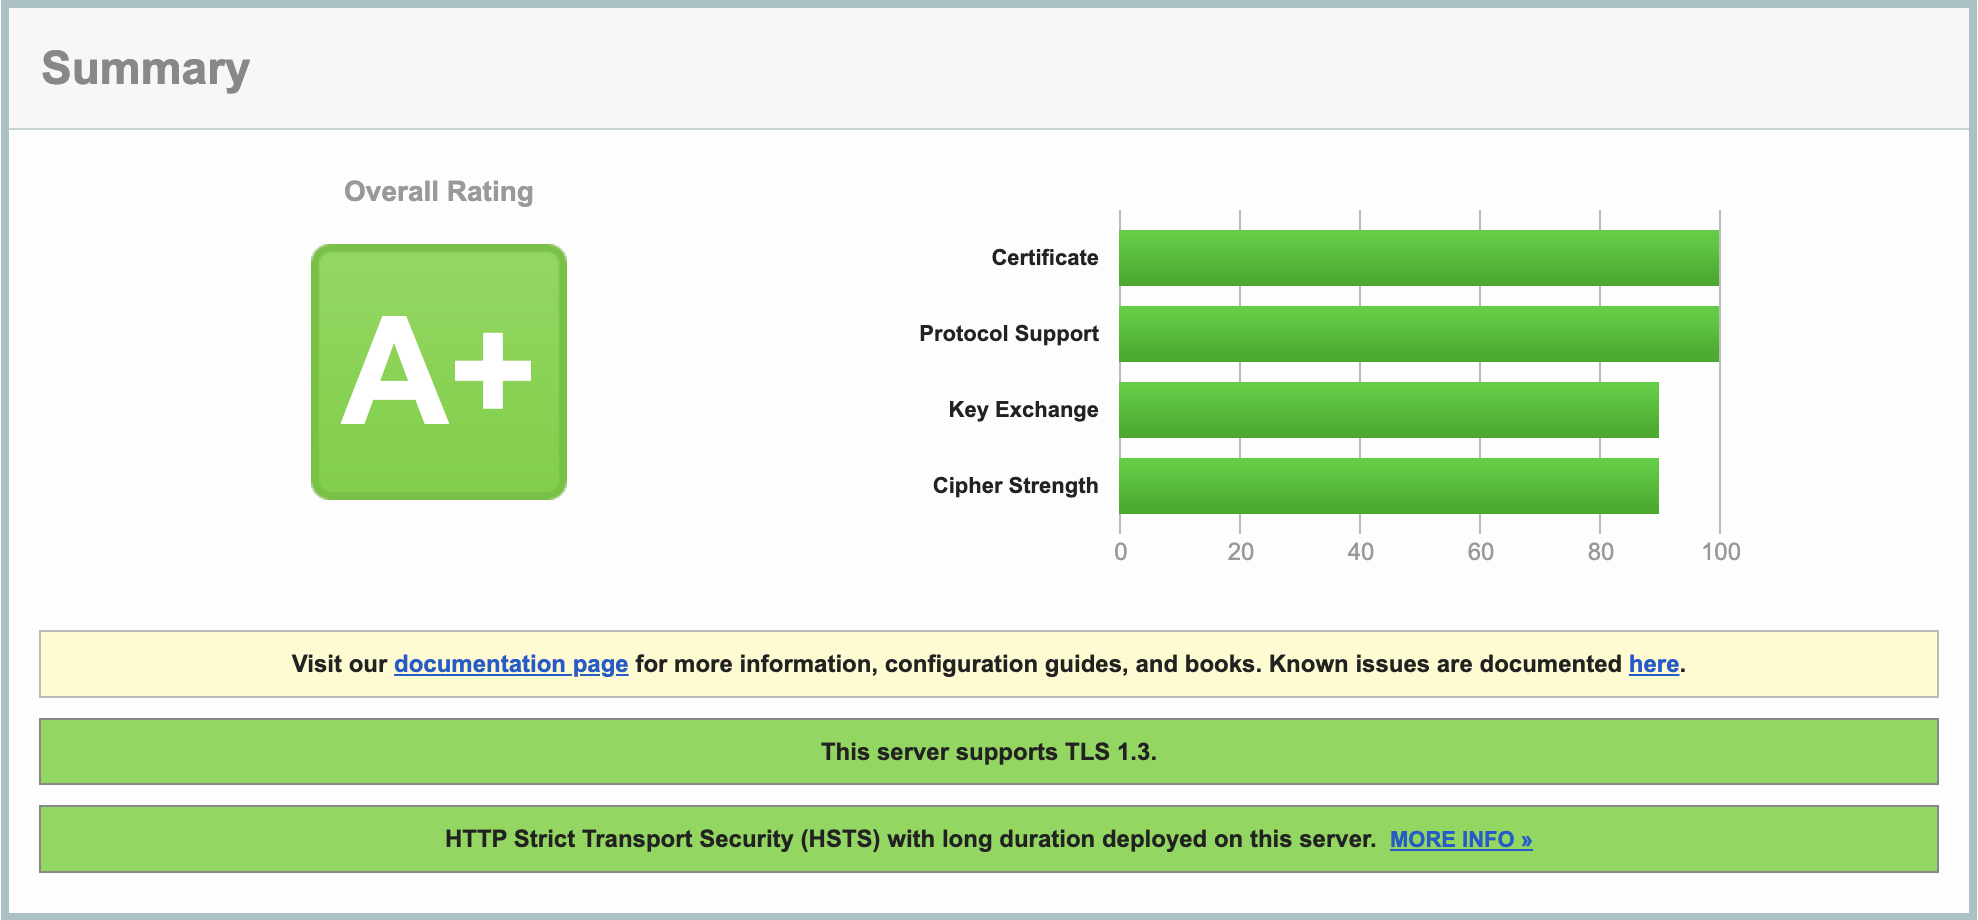
And if we rescan our SSL configuration (you may need to click the little “Clear cache” link to rescan), we also see a small improvement:

That concludes this chapter. In the next chapter of our installing WordPress on Ubuntu 24.04 guide, we’ll move a WordPress site from one server to another with minimal downtime.


